

Sometimes one item at a time is not enough. You are closing out a sprint and want to complete a whole batch of todos, or you are tidying a backlog and ten projects need to move to another role. Wherever Nestr shows you a list, you can select multiple items and act on all of them in one go.

Selection works just like it does in your file manager:
Selected rows are highlighted, and a pill at the top of the view keeps count. To start over, press Esc or click the ✕ in the pill. The selection also clears when you switch to another list or tab, change your search or filters, or complete a bulk action.
Multi-select is available in list views and in search results, including search tabs on your lists. Boards, the calendar and the mind map do not support it yet. To learn how to shape your lists in the first place, see Customising views.
As soon as more than one item is selected, the pill shows With selected. Open it to act on the whole selection:
Removes all selected items. The confirmation shows exactly what will happen, including how many nested items the selection contains, so there are no surprises. After deleting, a message appears with a single Undo that brings everything back. More on recovering items in Recovering deleted items.
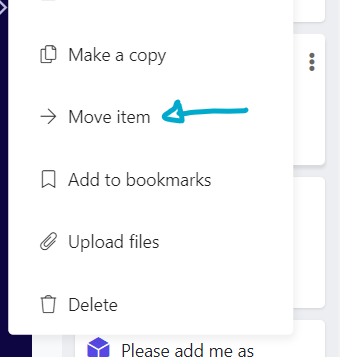
Asks you where the items should go, using the same destination picker you know from moving a single item. All selected items move to the destination you pick. Items that cannot make that move, for example because they would end up inside themselves, are skipped and listed in the confirmation.
Complete finishes every selected item that can be completed and is still open. Uncomplete reopens the completed ones. The two entries only appear when they apply to your selection, so the menu stays clean.
Downloads just the selected items, so you can hand-pick exactly what ends up in your spreadsheet. For what an export contains and the other ways to get data out of Nestr, see Exporting and backing up your Nestr data.
A bulk action is never a way around permissions. Before anything runs, Nestr checks every selected item against your rights. Items you cannot change are skipped, and the confirmation lists each one with the reason, for example "no rights" or "not completable". If nothing in the selection is eligible, Nestr simply tells you so. Read more in Rights management.
A selection is not only for the menu. Grab any selected row and you drag the whole selection with it. The drag ghost shows a badge with the number of items you are holding. Use it to:
Items you are not allowed to update are skipped with a short message. Dragging a row that is not part of the selection moves just that row, exactly as before.
Search is where bulk actions shine. Use Nestr search to gather items from across your circles, then select and act. For example, search label:bug, select the results with a shift click, and move them into your new triage project in one action. Search shows up to 100 results, so that is the most a bulk action there will touch at once.
That is all there is to it. Select, then act. Your projects and todos have never been tidied up this fast.
Nestr's vocabulary bends to how your organisation speaks. You can rename any label, and translate it into the languages your team uses, so the words people see match your culture. New to labels? Start with The power of labels.
Open Workspace settings → Labels, Fields & Tabs and select the label you want to change. The Name field holds its title. Type a new name and save, and the new term appears wherever that label is used across the workspace.
This works for the labels you create yourself and for Nestr's built-in labels. You can rename role, circle, and tension, as well as accountability and domain. If your organisation calls accountabilities "responsibilities" or domains "areas", rename them once and everyone sees your wording.
For a built-in label you have renamed, a Reset to default link sits next to the Name, so you can return to the original term at any time.

Nestr shows each person the interface in their own language, and your renamed terms can follow. Hover over the Name field and click the languages icon on the right to open the translations editor.
From then on, someone using Nestr in French sees your French term, someone in Dutch sees the Dutch one, and so on. The editor is titled after the term you are translating, for example "Translating: Accountability".

Renames and translations apply across the whole workspace, so the term stays consistent everywhere the label appears: in menus, on items, and in governance. Because accountabilities and domains are labels too, renaming them changes their titles throughout, including in your role and circle structures.
Nestr is built to fit the way your organisation already works, rather than asking your organisation to fit Nestr. Almost everything you see can be shaped to match your structure, your language and your needs. This page maps out what you can customise, with a link to a step-by-step guide for each area.
Some changes affect only you. Others change the workspace for everyone. We have noted which is which next to each one.
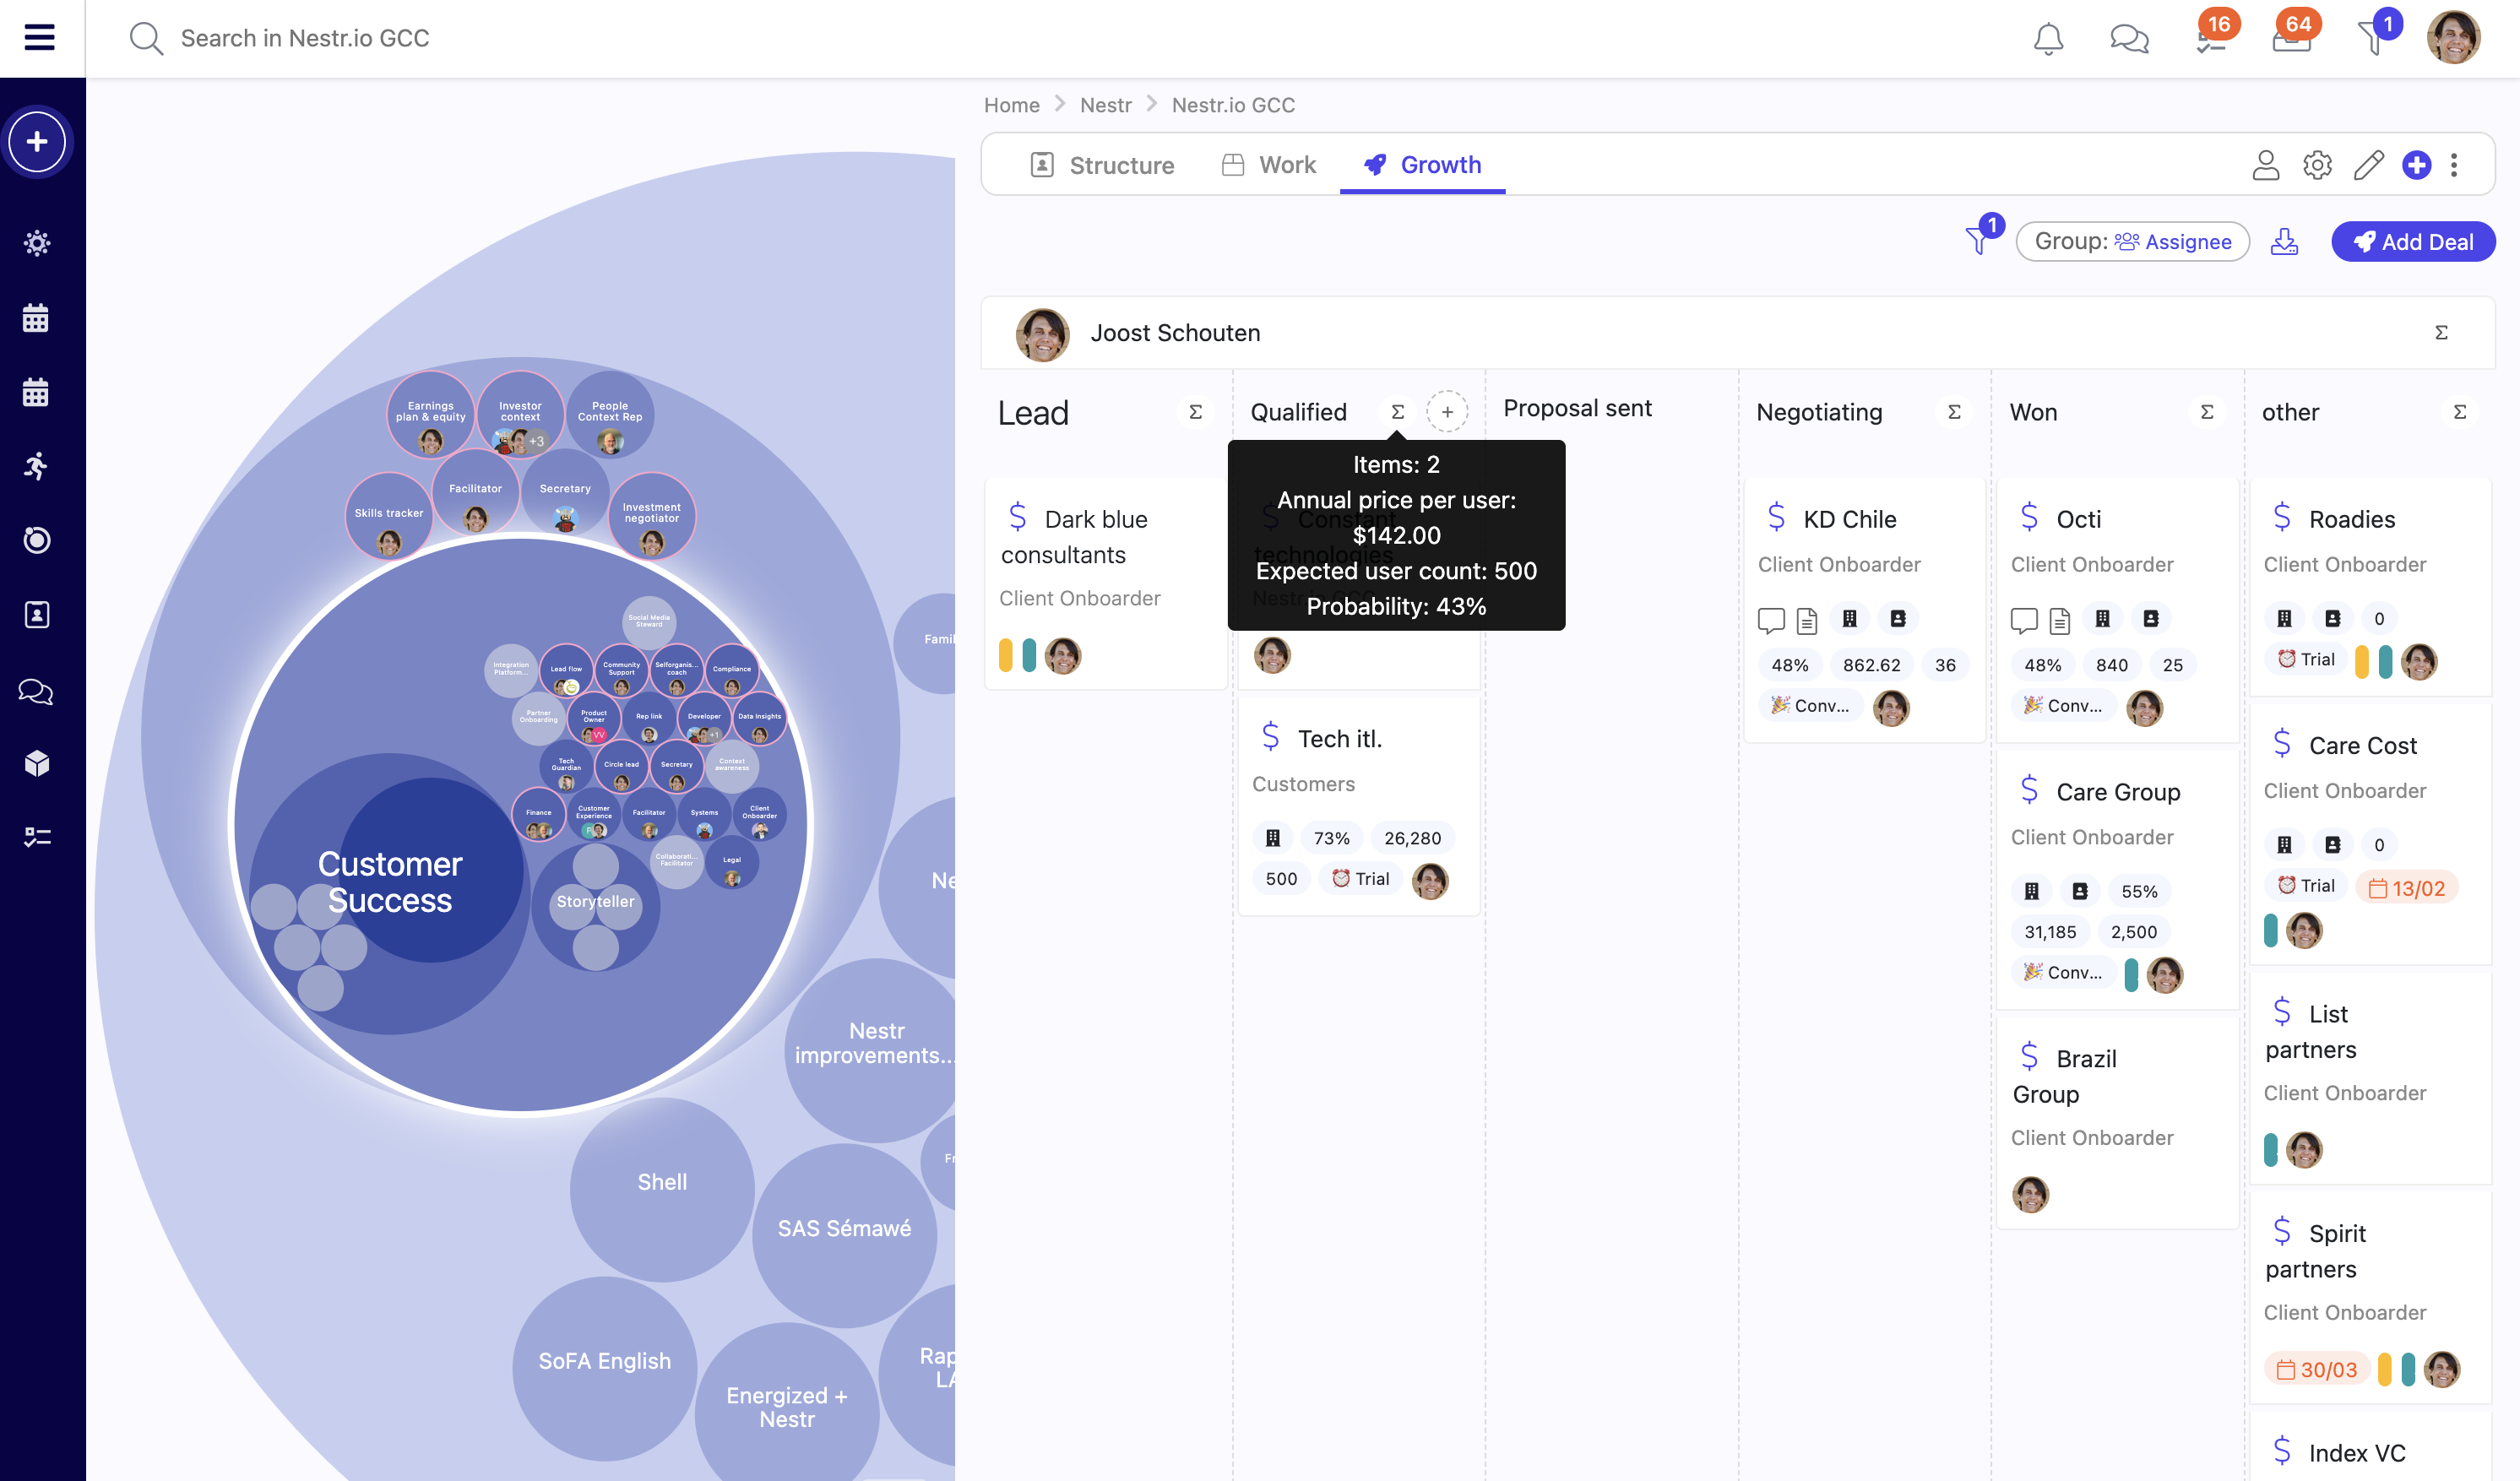
Wherever Nestr shows a list of items, whether that is a search tab, your own work, or a circle's projects, you can shape how that list looks. Nestr then remembers your choice, so the next time you open that list on the same device it is exactly how you left it.
Every list starts as a flat List. You can switch it to a column layout that groups items into columns by a field you choose, so you can work with it like a board.
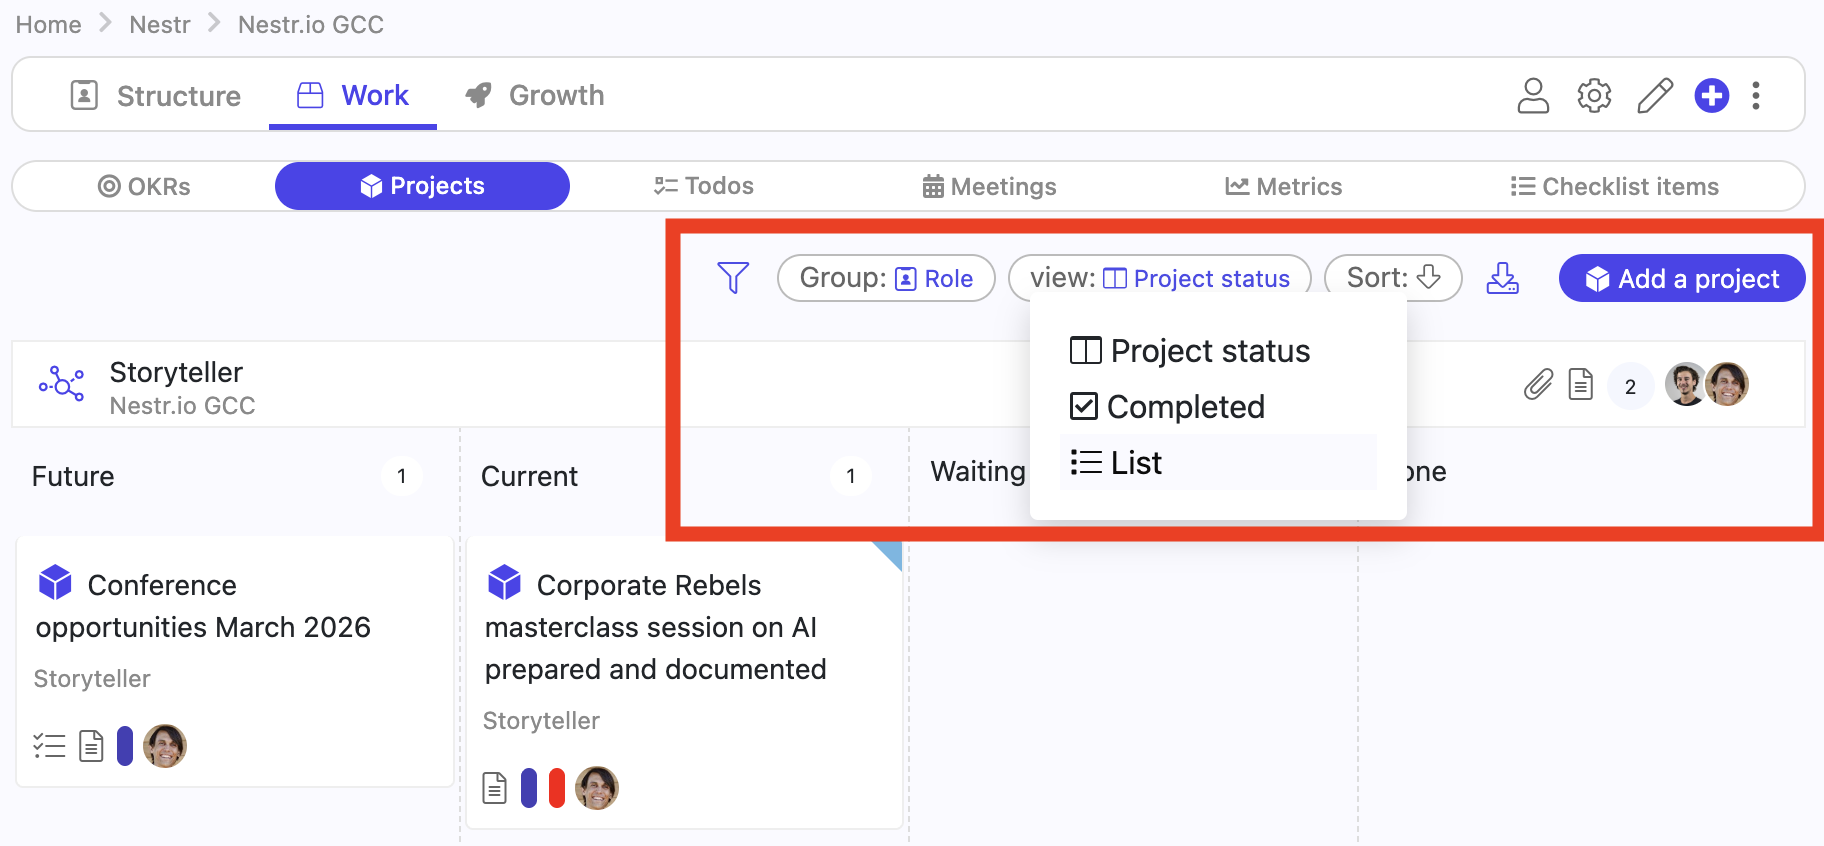
Use Group by to organise a list into sections or columns. You can group by:
Choose None to turn grouping off.
Use the filter icon to narrow a list down to just what you want to see. The filter panel adapts to the list you are looking at, so you only see the filters that make sense for it. Depending on the list, you may see:
A small number on the filter icon shows how many filters are active, so you always know when a list is filtered. For more advanced queries, see Nestr search.

Use the Sort menu to choose what the list is ordered by. The arrow next to Sort switches between ascending and descending, so you can flip the order with a single click.

The view, grouping, filter and sort you set are saved in the browser you are using. Open the same list again on that device and your setup is still there. Because the setting lives in your browser, a different device or browser starts fresh with its own defaults.
Lists are not just for looking at. You can select several items at once and delete, move, complete or export them together, or drag them all in one move. See Bulk actions.
Tabs sit across the top of an item and control what you see when you open it. A circle, a project, a role: each can have its own set of tabs. You can reorder the built-in tabs, hide the ones you do not need, and add your own.
Tabs are set per label, which is the type of item, so a change you make to projects applies to every project. Tabs are not the same as fields: a tab shows a saved search or a block of text, not a single piece of data. For fields, see Custom fields.
A workspace admin manages tabs in Workspace settings → Labels, Fields & Tabs. Select the label, which is the type of item you want to change, then open its tabs.

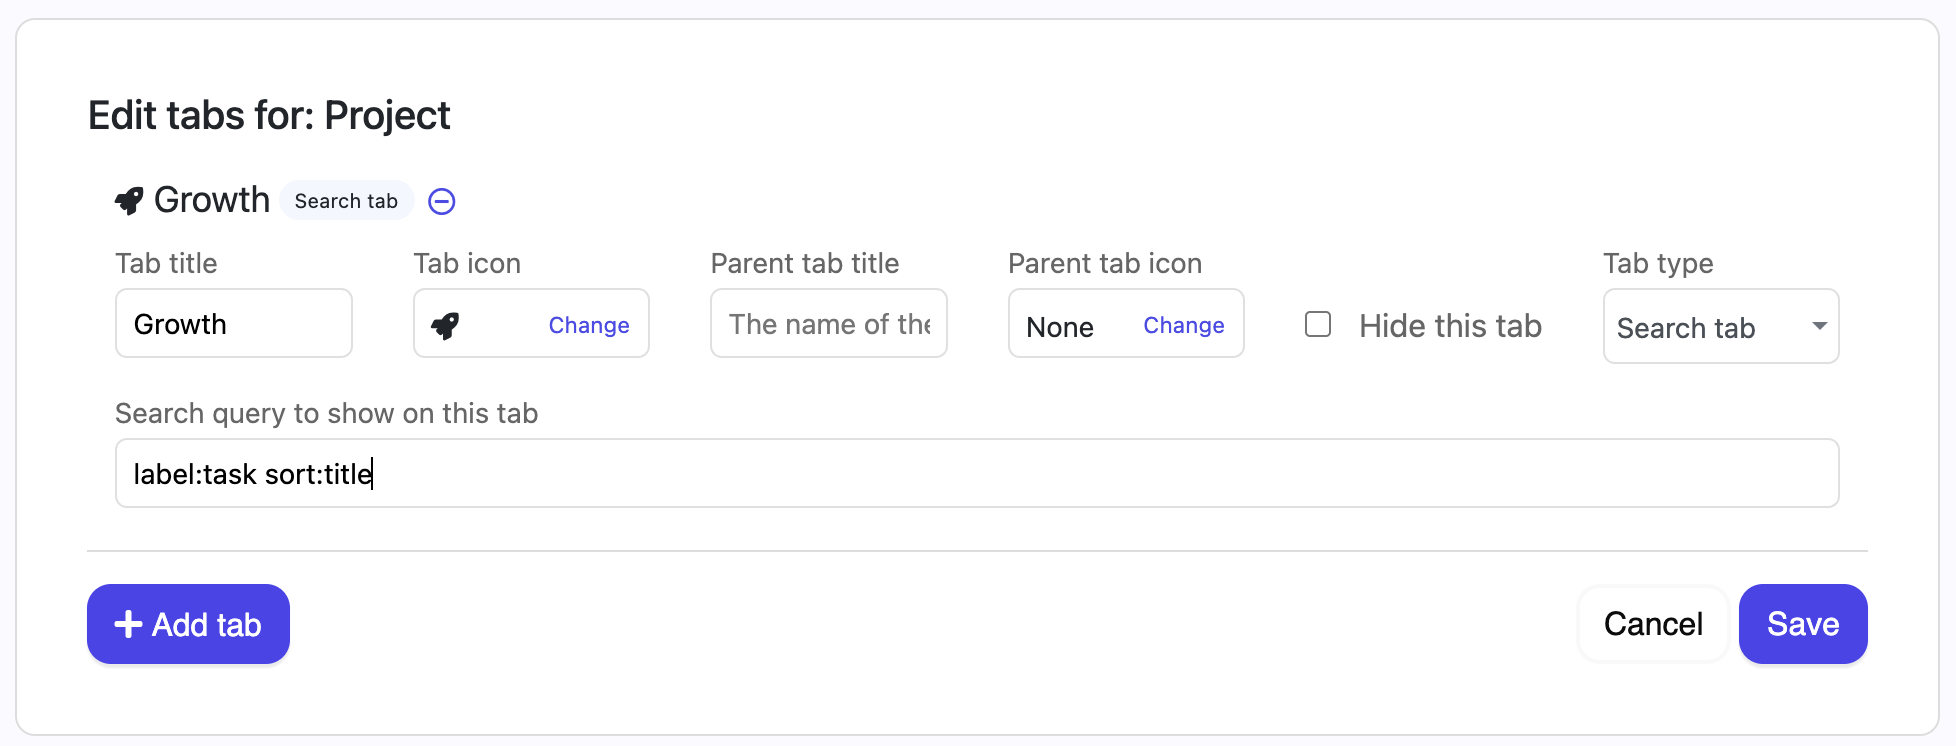
For help building the search behind a search tab, see Nestr search.
Built-in tabs cannot be deleted, only hidden, so you can always get them back. If you have changed a built-in tab and want the original again, reset it to its default.
Because tabs are set per type of item, your changes apply to every item of that type across the workspace, and everyone who opens one sees the same tabs. Some apps also let you tailor tabs for a specific circle. The Scrum & Agile app, for example, offers a Customise option on each work type.
The OKRs app lets you set and track Objectives and Key Results across your organisation, so everyone can see what you are aiming for and how progress is measured. It is available on Pro plans.
This article covers turning the app on, creating your first OKRs, and how OKRs relate to your circles. For custom fields, see Custom fields.
A workspace admin turns the app on in Workspace settings → Applications.

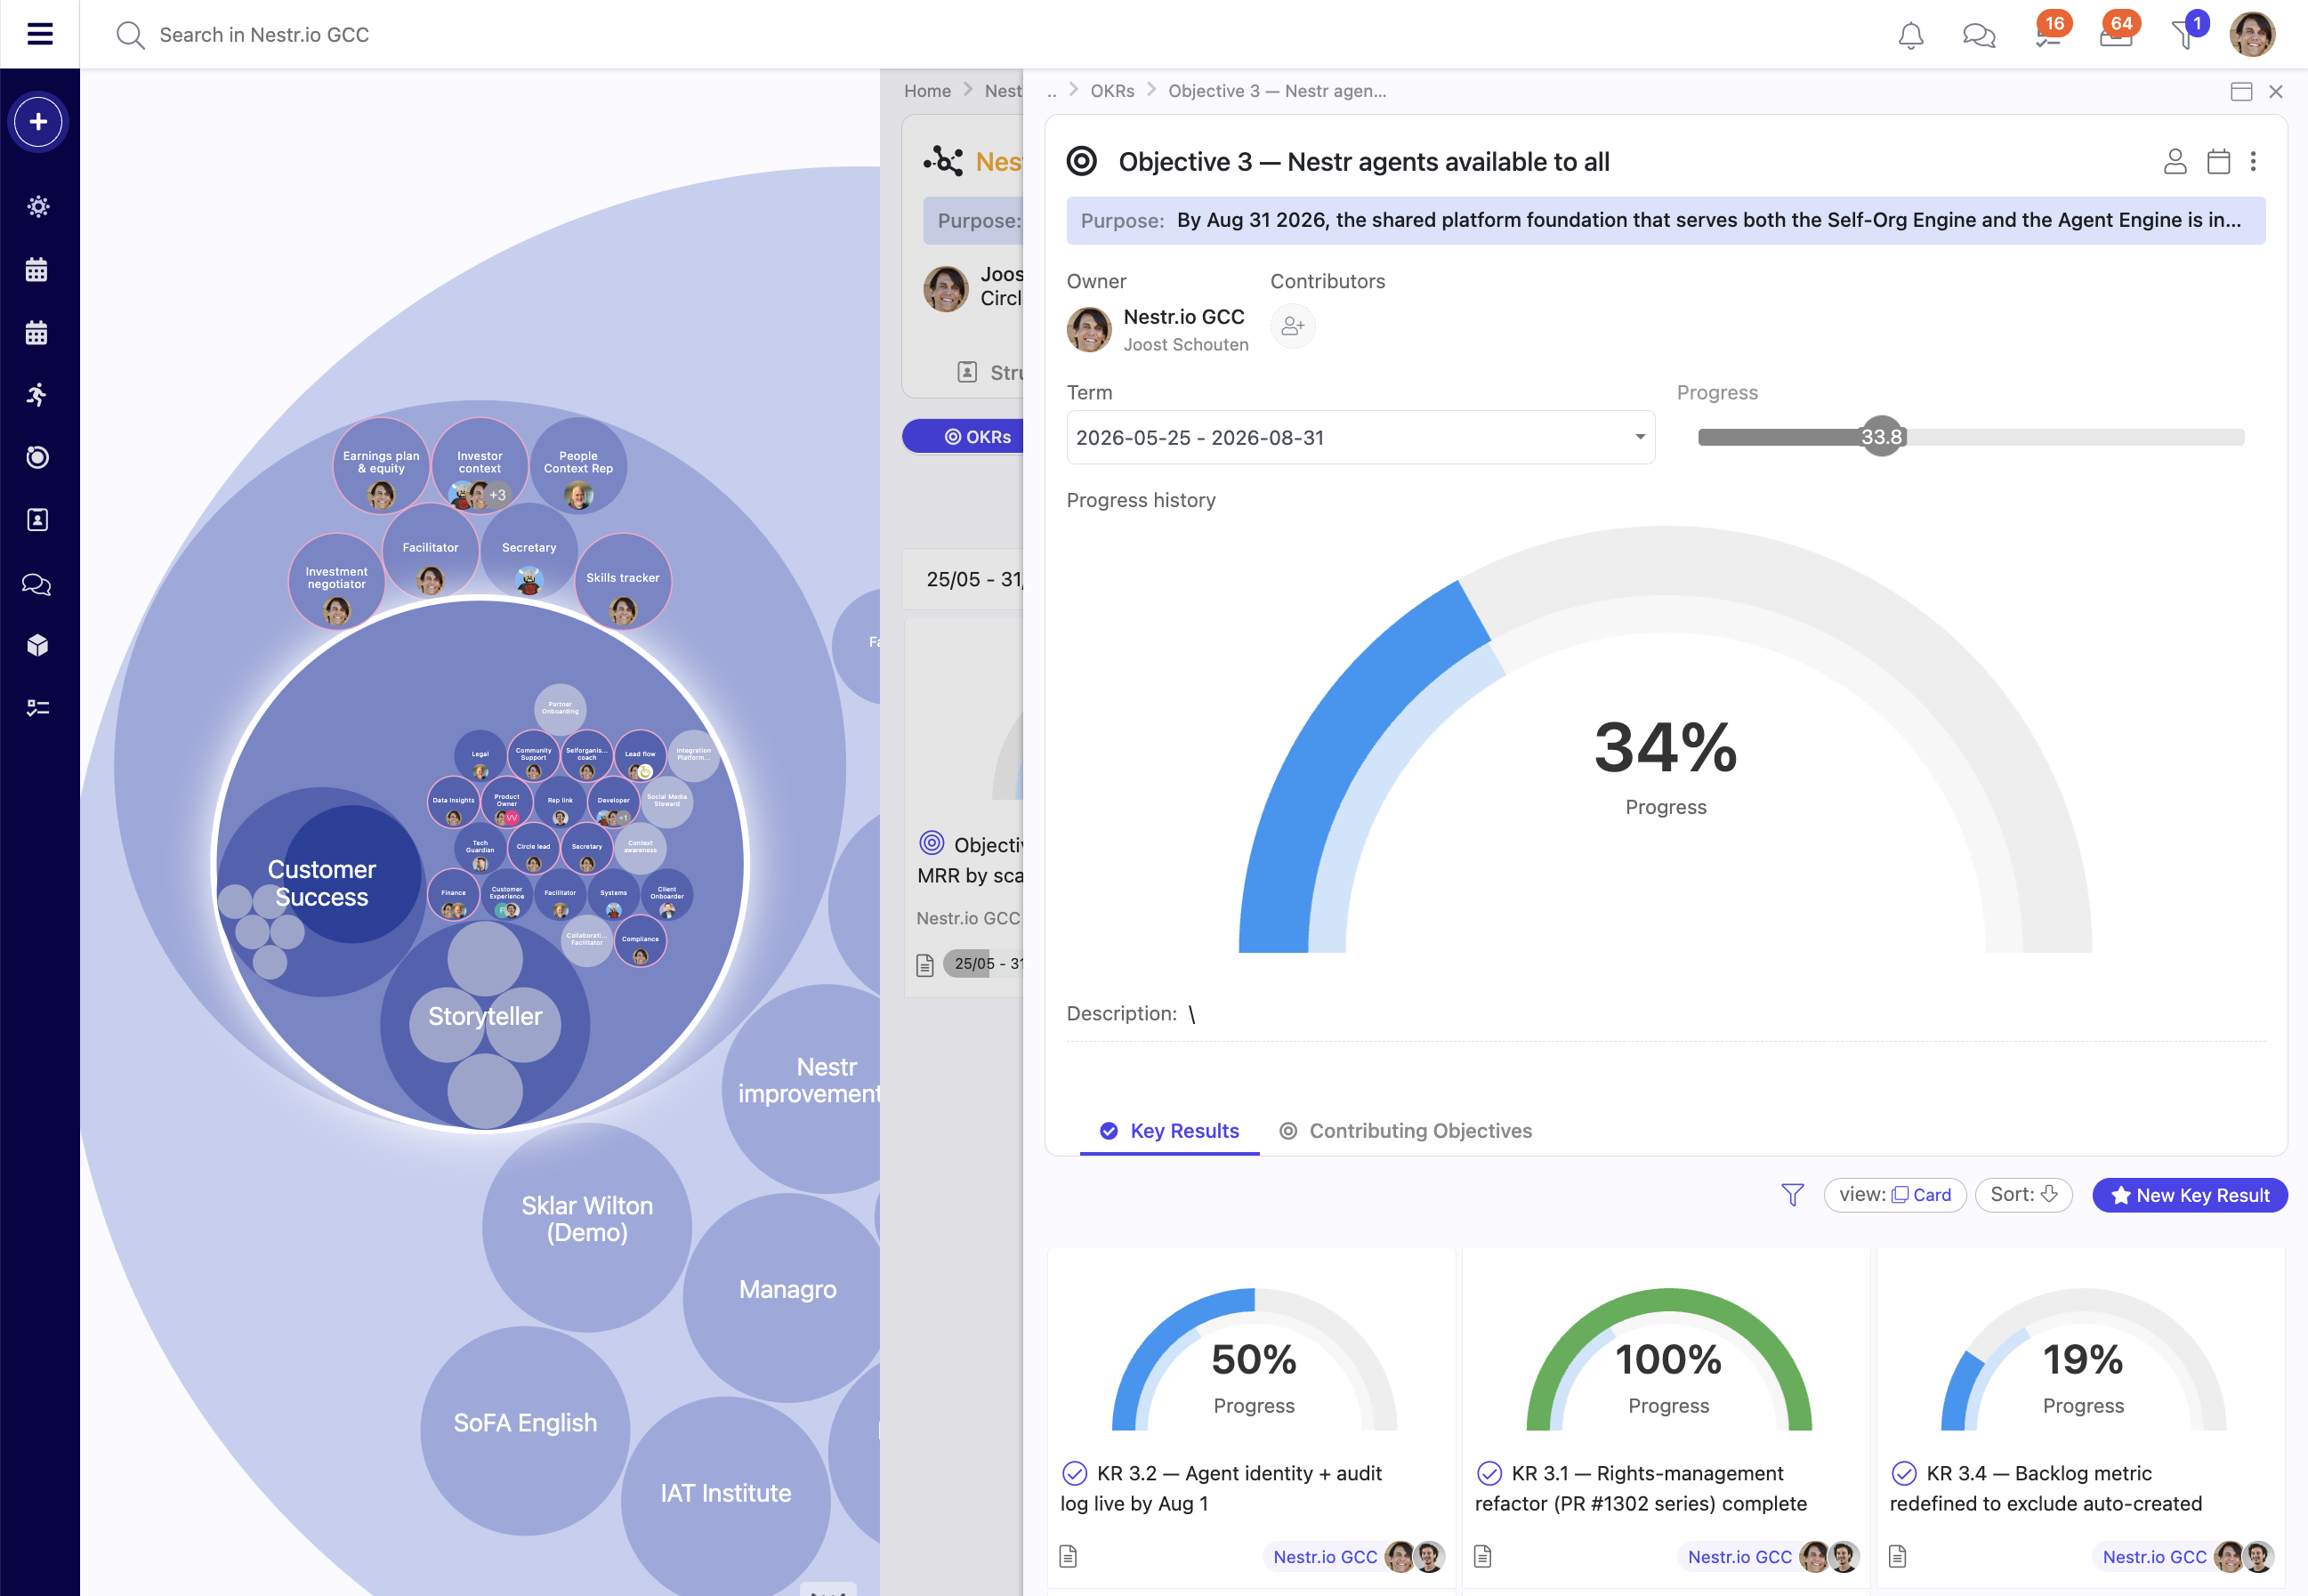
OKRs follow your circle structure:
OKRs do not cascade automatically. Each circle sets its own objectives that align with its parent, rather than inheriting them. This keeps every team's goals owned by that team.
The Agentic work app brings Nestr's AI into your workspace. It is the single home for everything AI in Nestr. It replaces the separate Nestradamus and AI Agents features by folding them into one app, so there is one place to configure how AI shows up and what it can do.
The app is on by default for every workspace. You can toggle it in Workspace settings > Integrations. This guide explains the moving parts for a workspace admin: the two ways AI appears, what is free versus what draws on credit, how AI credit and limits work, context files, and how to turn the app off.

The Agentic work app is where your workspace's AI lives. Turning it on makes the in-workspace AI features available. Turning it off switches them off for that workspace. Because it is on by default, most workspaces already have it running and only need to decide whether to add credit and upload context.
AI appears in your workspace in two distinct ways. They behave differently, so it helps to know which one you are using.
The assistant helps a specific person. It acts as the person it is helping, with exactly that person's permissions. It can read the same records and make the same changes they can, never more. If a user cannot see a circle or edit a project, neither can the assistant while helping that user.
The assistant is good for two things: product and how-to questions about using Nestr, and getting work done inside your workspace on the user's behalf. You reach it by mentioning it with an @mention or by messaging it directly.
For a deeper look at the assistant, see Nestradamus.
AI colleagues energize roles the way a team member does. An AI colleague assigned to a role acts within that role's accountabilities. It can respond to messages, run projects, process tensions, and more, all scoped to what the role is responsible for. This is how you put AI to work as part of the organisation rather than as a helper for one person.
There are two kinds of AI activity, and they are billed differently.
In short, asking how a feature works is free. Having the AI do work against your data uses credit.
AI credit is prepaid and held in your subscription currency. New Team and Pro workspaces, and existing workspaces with an active subscription, start with a small starter credit so you can try it.
Top up from Workspace settings > Workspace plan & billing, in the AI credit section. Choose 5, 10, 50, 100, or a custom amount over 100. For existing customers it is a one-click charge to the card on file. New customers complete payment in checkout.
Turn on auto top-up to add credit automatically when the balance drops below half of your chosen amount. This keeps workspace work running without manual top-ups.
Set a monthly spend limit to cap how much a workspace can spend per month. This is a safeguard against unexpected spend.
When credit runs out, or the monthly limit is reached, the assistant stays available for product support but pauses workspace work until you top up. It will tell the user how to add credit, so people are not left guessing why a request did not complete.
On the Agentic work app you can upload reference documents that the assistant should always have in mind inside your workspace. Good examples are an organisation constitution, an employee handbook, or an onboarding guide. These act as always-on context for the AI.
Keep context files limited in size and scope. They are always-on context, not a document library. A short, focused set of references works better than a large pile of documents.
Context files stay within your workspace. They are only used for authenticated work in that workspace.
If you disable the Agentic work app for a workspace, the in-workspace AI features turn off for that workspace. Product support through the public assistant remains generally available, so people can still ask how-to questions about Nestr.
Verifying a domain confirms to Nestr that your workspace owns a company email domain such as example.com. Once a domain is verified, Nestr can treat everyone with an email on that domain as part of your organisation, which unlocks several admin and security features.
Note that you can enable/disable these features based on your needs.
Only workspace admins can add domains.
The domain appears in the list straight away with a Pending verification status, shown as a clock icon.

You do not need to add a DNS record. After you add a domain, the Nestr team reviews the request to confirm the domain belongs to your workspace. This usually happens within 24 hours. Once approved, the domain shows a green Verified check and the features above become available.
If a domain has been pending for more than 24 hours, contact us and we will look into it.
Each verified domain has an Auto-join toggle. When it is on, new users who sign up with an email on that domain join the workspace automatically. Turn it off if you want to keep the domain verified for name and email editing, SAML, or SCIM without letting everyone in automatically. Whether new members still need admin approval depends on your invitation settings on the same page.
Click the trash icon next to a domain to remove it. Members who already joined keep their access, but the features tied to that domain stop applying.
The Scrum and Agile app turns any circle in your workspace into a lightweight agile team. You get a backlog, a sprint kanban, epics and milestones that group stories above the sprint, and a burndown chart that updates itself as stories close out. Nothing else about your circle changes, so you can keep meetings, metrics, and projects running alongside.
This guide walks through enabling the app, what changes on the circle, how user stories, sprints, epics, and milestones fit together, the burndown mechanics, and how to customise the app for your team's process.
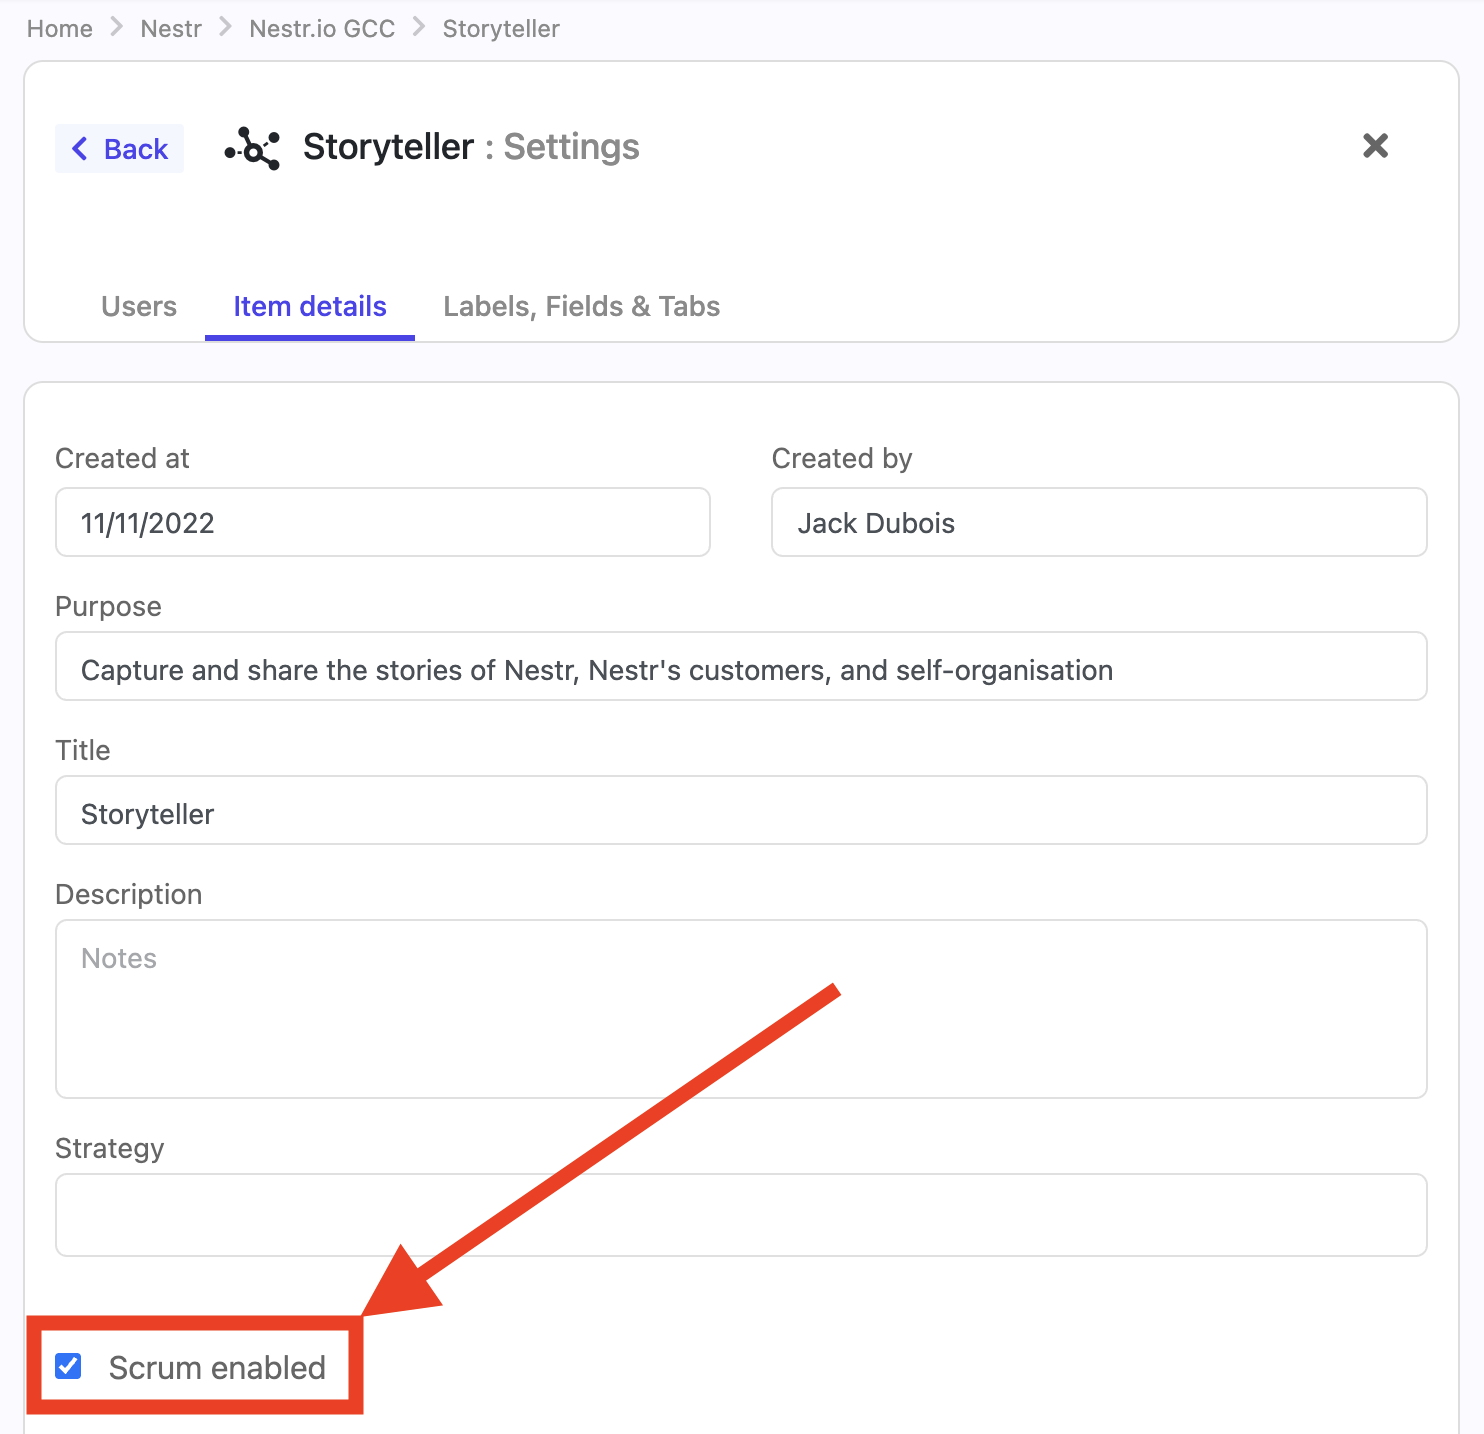
Two switches need to be on for Scrum to show up: one at the workspace level and one on each circle that should run sprints.
This unlocks the Scrum labels (user story, sprint, epic, milestone) for the whole workspace and reveals the per-circle opt-in on every circle. The card also lists the circles that already have Scrum enabled and carries the Sprint, Epic, and Milestone feature toggles for the workspace.

Scrum is opt-in per circle so that only the teams that run sprints get the extra behaviour. It is off for every circle until you switch it on, so a design circle and a product circle in the same workspace can both run their own sprints without interfering, while finance stays on plain projects. There are two ways to enable a circle.
From the app card. Under Circles with Scrum enabled on the Scrum / Agile card, click Edit and tick the circles that should run Scrum. This is the quickest way to switch several circles on at once.
From the circle.
Either way, the circle's Projects tab updates as soon as Scrum is enabled.
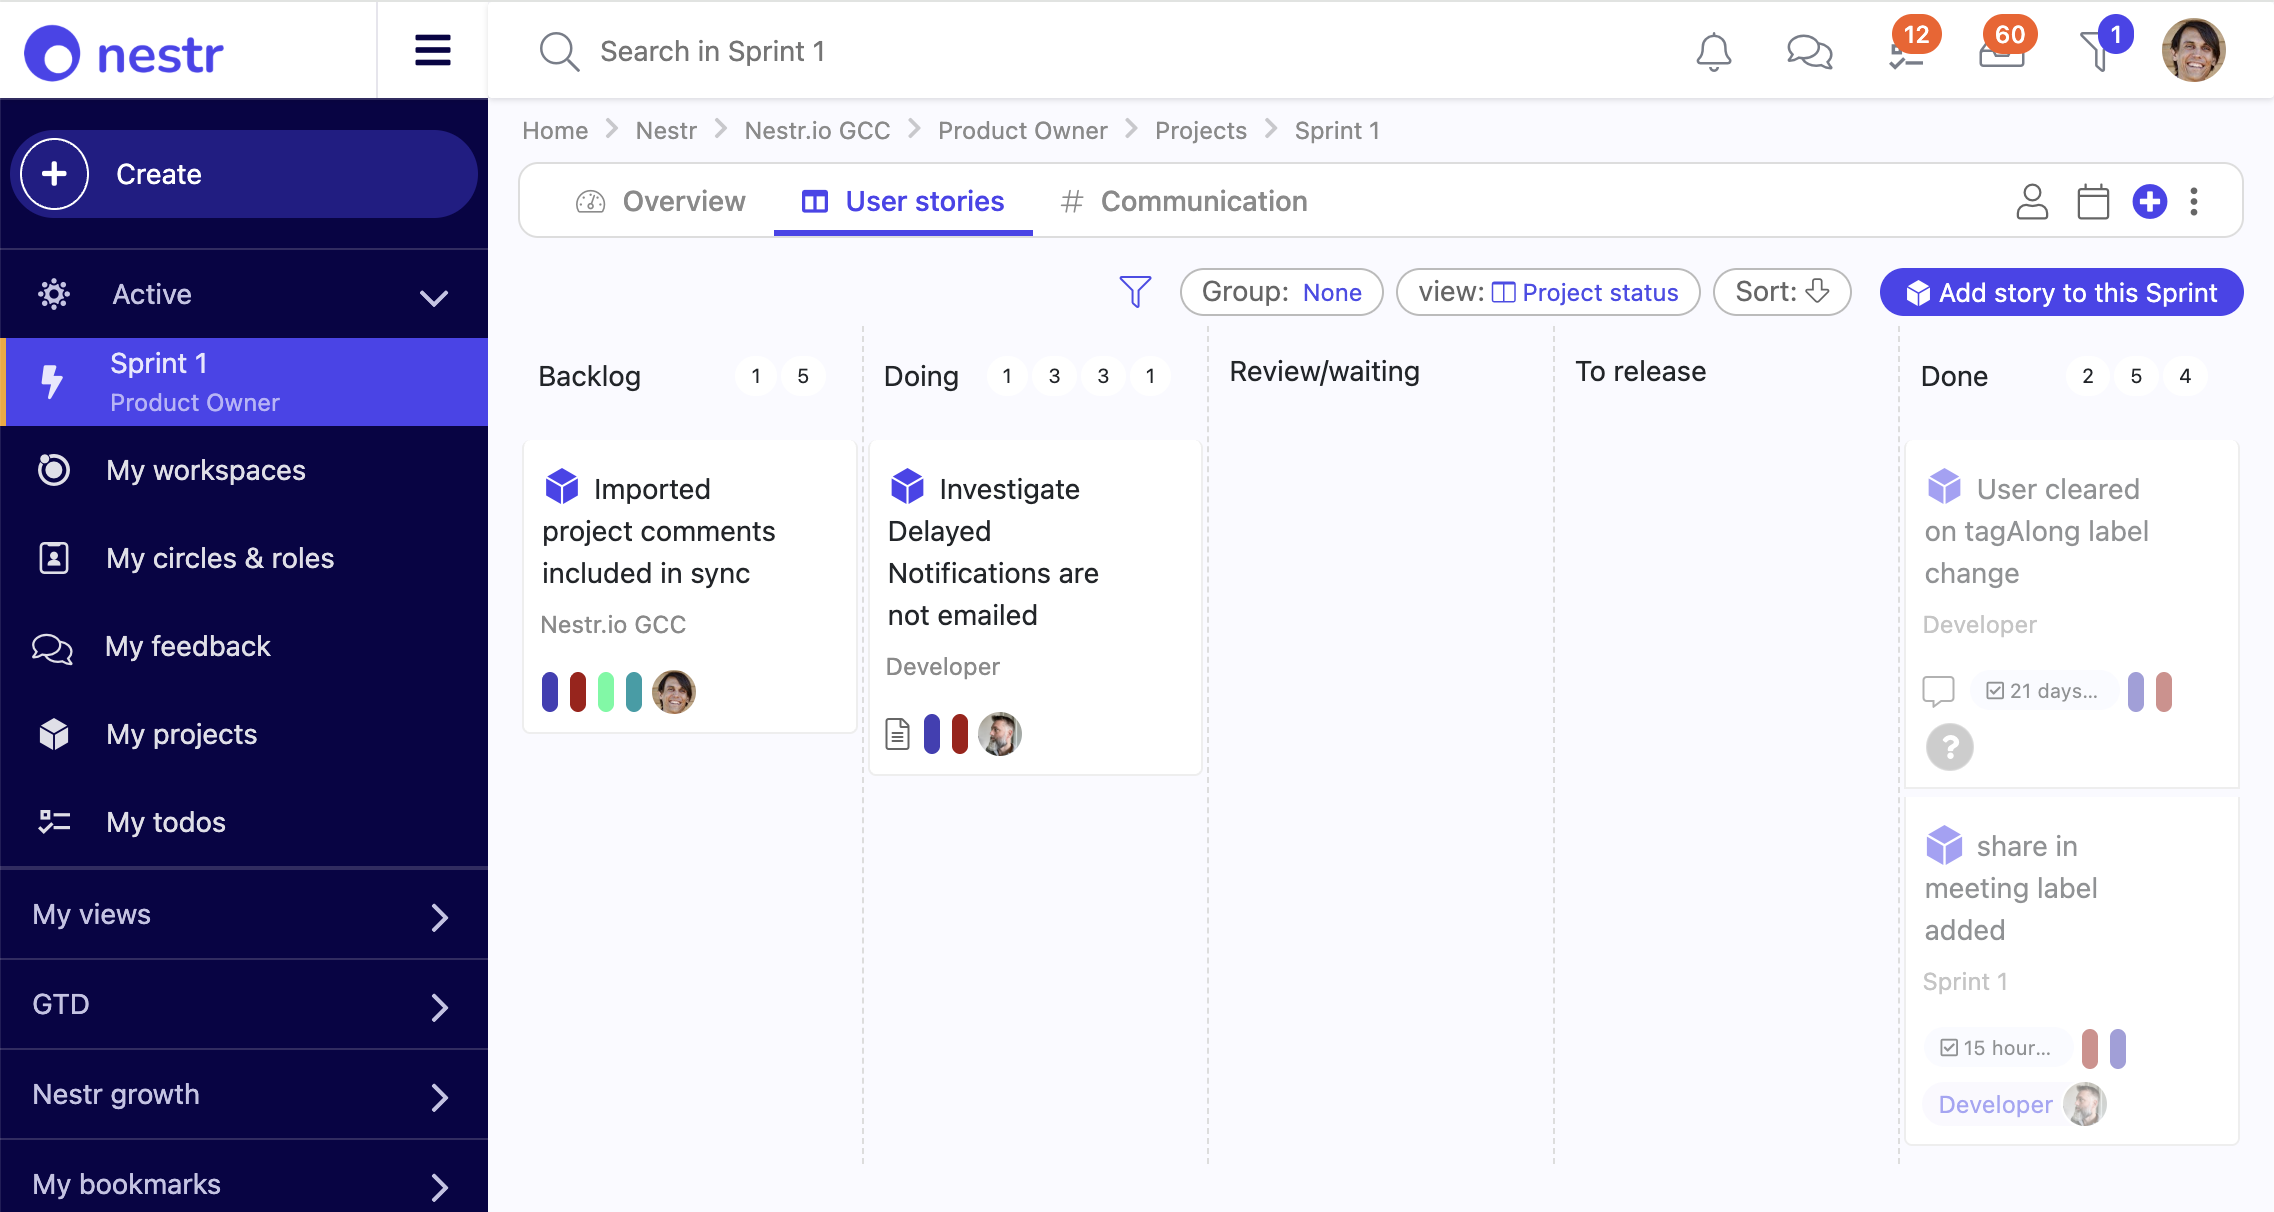
When a circle has Scrum enabled, its existing Projects tab becomes the Scrum board. There is no separate Scrum tab group: keeping everything on the Projects tab means a Sprint, an Epic, and a regular project (a user story not yet in a sprint) all coexist in the same place.
Three things change on the Projects tab:

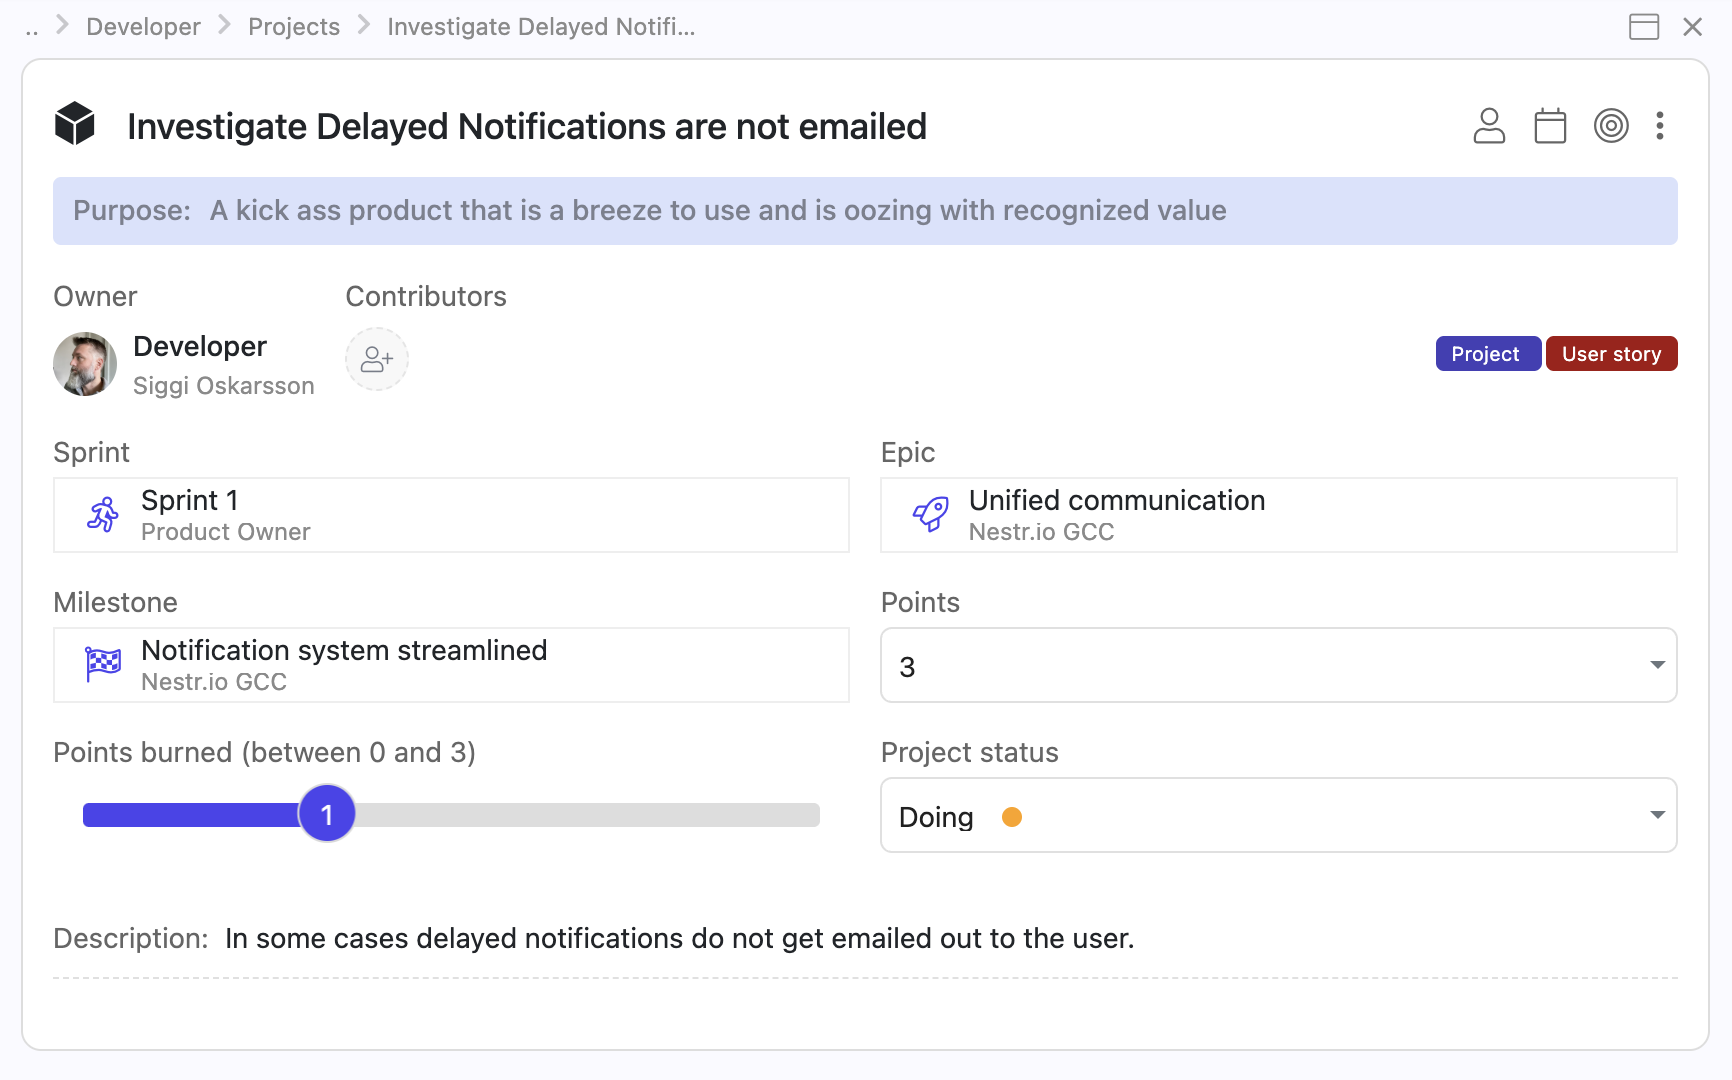
A user story is the unit of Scrum work. Each story carries:
Stories also carry the standard project status field (Future, Current, Waiting, Done) which is what drives the sprint kanban columns and the burndown.
There is no dedicated story type field in this version. To flag a story as a bug, add the global bug label to it. If your team wants a fuller set of types, add a select field to the user story label (see Add custom fields on the Scrum labels below) with whatever options you use.
The user story label also adds the project label, so every story is also a regular project. It shows up in the rest of Nestr's project surfaces (workspace search, project reports, the role's Projects tab) the same way any other project does, and todos can hang off it as usual.
The role or circle the story belongs to is the team that owns the work. Pick it during creation in the same way you pick a parent for a regular project.
A sprint is a time-boxed iteration. It carries:
Sprints surface in two places: as columns on the circle's Projects tab when grouped by Sprint, and as their own items you can open for the full board and details.
Open a sprint to see two tabs:
The dedicated sprint kanban. Stories assigned to this sprint group into four columns by their project status:
Drag a story from one column to the next to advance it. The kanban view sorts stories within a column by manual order, so you can also reorder by dragging up and down within a column.
Aggregates comments from the sprint itself plus every story linked to it via the Sprint field. All sprint-related conversations sit in one stream, and you can post a sprint-level comment directly here too. This is the place to track sprint-wide discussion without losing the per-story threads.
Three fields drive the chart, two of them computed:
Each story has its own Points burned slider. Two things drive it:
The chart defaults to a line view. A toggle on the chart switches to a gauge if you want a single completion ratio instead.

Sprints are not user-completable in this version. The term and the burndown tell the team where they stand; there is no "tick the box to close" step. If a sprint passes its end date without all stories in Done, it shows as overdue (red badge on the list view card, picked up by overdue filters and search) so the team gets a nudge.
An epic is a scope axis: a feature or initiative that lives longer than a single sprint. Each epic carries:
Open an epic to see its Stories tab. Stories belonging to this epic group by sprint, with a Backlog group for stories that have no sprint yet. The sprint groups are ordered by their start date, so the nearest active sprint comes first.
That layout is the whole point of epics: a single screen shows the work for this initiative that already shipped, the work that lands in the next sprint, the work that comes after that, and the work still in the backlog. Update the epic status as the initiative progresses so anyone scanning the epic list sees what is moving.
An epic also has a Communication tab that aggregates comments from the epic itself plus every linked story, the same way sprints do.
A milestone is a time-boxed delivery target that sits above the sprint: a release, a version, or a phase that groups user stories across several sprints. Where an epic tracks a feature by scope, a milestone tracks a ship date. Each milestone carries:
Open a milestone to see its Stories tab, where stories group by sprint with a Backlog group for stories not yet in a sprint. That gives you one screen showing how a release breaks down across its sprints. A milestone also has a Communication tab that aggregates comments from the milestone and every linked story, the same as sprints and epics.
Set a story's Milestone field to roll it up, and group the circle's Projects tab by Milestone to see the whole release at a glance.
Scrum stories are also projects. They carry the project label in addition to user story (the user story label adds project automatically), which means:
The same applies to circles: a Scrum-enabled circle still has Roles, Domains, Policies, Meetings, Metrics, Todos, and Notes if you have those apps on. Scrum is additive.
Different teams run different flavours of Scrum. A few customisation patterns cover most of what teams need, all from workspace settings, no custom labels or engineering required.
Not every team says "sprint", "epic", and "milestone". You do not need a custom label for that: rename the built-in one. On the Scrum / Agile card in workspace settings, each work type (Sprint, Epic, Milestone) has a Customize link that opens that label for editing, where you can rename it and add fields. The new name then flows everywhere the label appears: the Add buttons, the Group by options, the field titles on a user story, and the empty-state copy. Common renames are Sprint to Iteration or Cycle, Epic to Initiative or Theme, and Milestone to Release, Version, or Phase.
So if your team groups sprints under a higher delivery target it calls a "Release", rename the Milestone label to Release and use it as is. Its status, term, points roll-up, and burndown all come with it.

Sprints, epics, and milestones are each toggled on that same Scrum / Agile card. A team that plans in sprints but never groups them into releases can switch milestones off: the Add button, the Group by option, and the Milestone field on a story all disappear for that workspace. All three are on by default.
The sprint board groups by the workspace's project status field. The default field has four options (Future, Current, Waiting, Done) which map to four columns. To add columns, add options to the project status select field in the workspace's Labels & Fields settings.
Common extensions:
The user story, sprint, epic, and milestone labels accept custom fields the same way any Nestr label does. Common additions:
Can a story belong to more than one sprint?
No. A story sits in zero or one sprint. To carry unfinished work into the next sprint, change the story's Sprint field to the new sprint.
What happens to the burndown when a sprint passes its end date?
The chart keeps plotting against the original term. Past the end date, the sprint flips to overdue on the list view. Reopening completed stories or adding new ones after the end date still updates total and burned, so the chart stays accurate.
Where does the burn slider live?
On each individual user story, directly below the Points field. The sprint's Points burned is a sum of those per-story sliders, computed automatically, not a slider you drag yourself.
Why doesn't the burned points field move when I drag a story onto Done?
It should. Flipping a story's status to Done snaps the story's own Points burned slider to its full point value, which the sprint's sum picks up immediately. If the story has no points, there is nothing to add, so check the story's Points field first.
Can I disable Scrum on a circle without losing the data?
Yes. Untick Scrum enabled on the circle. The Projects tab reverts to its standard form but the sprints, stories, epics, and milestones stay in the database. Tick the box again to bring the Scrum behaviour back with everything intact.
How do I see all work across a release or milestone?
Use the built-in Milestone relationship. Set each story's Milestone field, then either open the milestone for its Stories tab (grouped by sprint) or group the circle's Projects tab by Milestone. If your team calls it something else, rename the Milestone label (see Customising) and it works the same way.
Rights management lets you shape what every member of your workspace can read, create, update, and delete. It works in two layers: a baseline that applies to everyone, and named permission profiles you can attach to individual users or to roles inside circles. When a profile is attached to a role, anyone filling that role picks the profile up while assigned and loses it as soon as they step out of the role.
This guide walks through where to find the editor, how the baseline works, how to build a custom profile, and the two ways to hand a profile to your members. For context on workspace members and the built-in owner / admin roles, see Managing users, invitations and permissions.
Rights management lives on your workspace settings page. As a workspace admin, open the workspace, then go to Workspace settings → User Permissions & Domains. Scroll past the invitation permissions and the associated domains list, and the Rights management section sits at the bottom.

Rights management is part of the Pro plan. Workspaces on the Free or Starter plan see the editor in read-only mode with a prompt to start a two-week trial or to upgrade. The trial unlocks the full editor immediately. While trialing the Pro plan, the upgrade prompt offers to make the trial permanent. See Pricing and plans for the plan details.
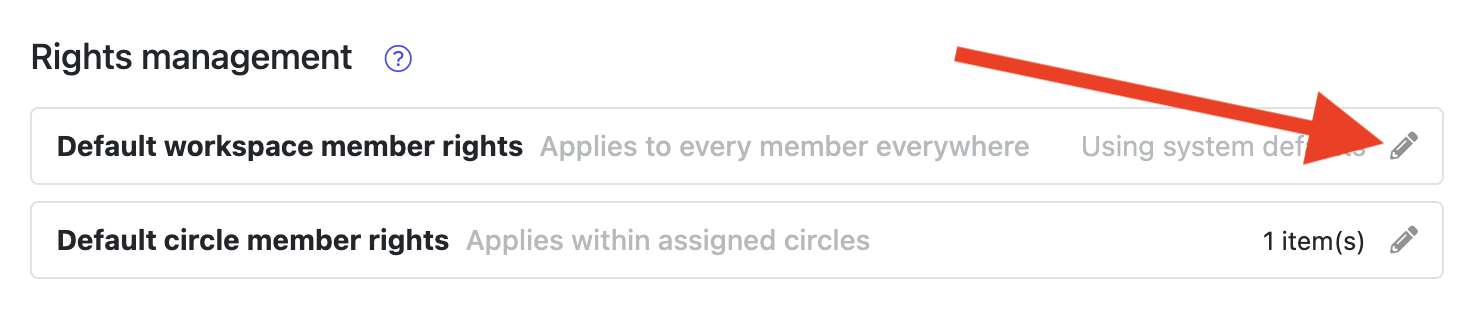
The two cards at the top of the Rights management section define the rights every workspace member starts with. Use these to widen or narrow the standard behaviour without having to assign anything to anyone.
Each card shows “Using system defaults” until you add something to it. Click the pencil icon to open the editor. The editor only carries rules where you want to change the default, so leaving a row at “Default” means Nestr falls back to its built-in behaviour for that item.
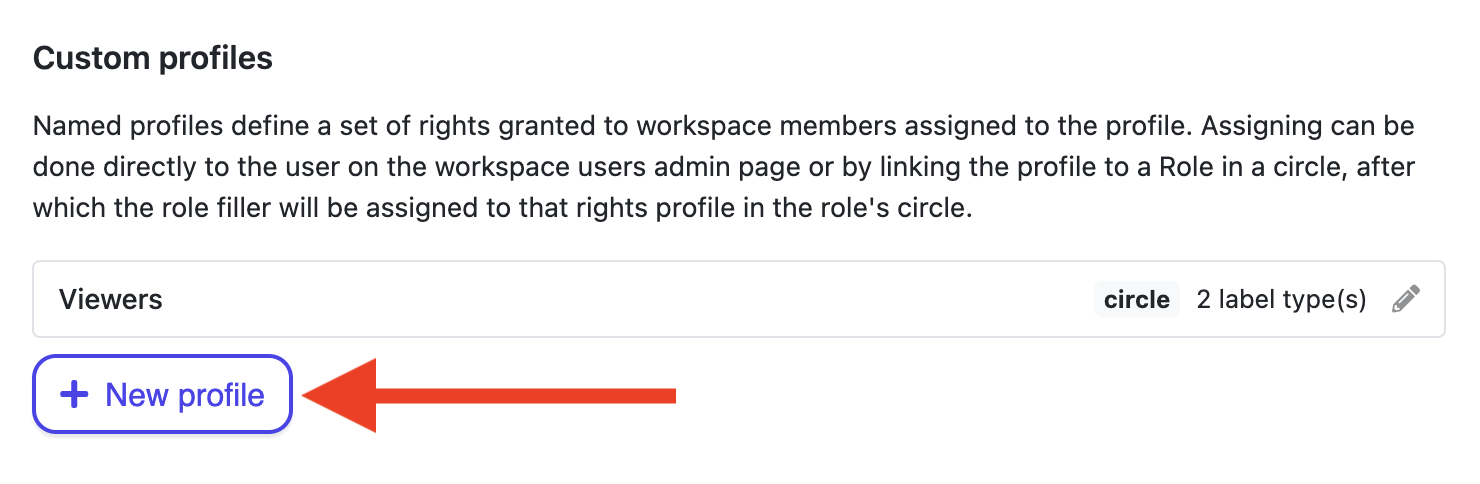
Below the defaults you will find the Custom profiles list. A profile is a named bundle of rights you can hand out to specific people or attach to roles. Profiles are the right tool when only some members need certain access, or when the access should change as people move in and out of roles.
Scope controls where a profile’s rights apply when someone holds it. There are four options:
For most role-driven profiles, Circle is the right pick. It keeps the rights inside the circle the role belongs to.
Inside a profile, the Rights table is where you define what people with this profile can do. Each row covers one item type. To add a row, pick from the Add item rights… dropdown.
The dropdown is grouped:
Each row has these controls:
More specific rows win over less specific ones. So a row for the Project label overrides a row for “All nests”, and “All nests” only kicks in for items that no other row covers. Within one operation a No on a more specific row also overrides a Yes on a broader row.

The plus button on the right of each row adds a sub-row underneath it. Sub-rows give you finer control over the same item type without adding more top-level rows.
You can add:
Click the trash icon next to any sub-row to remove it.

Profiles do nothing on their own. They take effect when you attach them to a user. There are two paths.
Open Workspace settings → Users and click a user. The user panel lists every workspace-level right you can toggle for that person. Every custom profile in the workspace appears here with a switch. Flip the switch on to grant the profile, off to revoke it.
This path is the right one when an individual needs the rights regardless of which roles they fill. Auditors, security reviewers, finance admins, and similar workspace-wide functions fit this pattern.

This is the path that makes rights follow the work. When a profile is attached to a role, anyone filling that role picks up the profile inside that role’s circle. As soon as they step out of the role, the profile is removed from that circle context. Nothing else about the user changes.

From now on, whoever fills the role gets the profile inside the role’s circle automatically. Assign three people, all three get it. Remove one, only that person loses it. Add a fourth, they pick it up on the spot.
A few things to know:
For background on roles, circles, and the four core governance roles, see Building your org structure.
Workspace-scoped profiles support two auto-apply triggers. When enabled, Nestr attaches the profile to a new member automatically as they join.
Auto-apply is only available on profiles scoped to the workspace. Circle, Circle + sub-circles, and Tree scopes have no anchor at the moment of join, so the triggers do not apply.

For a given user looking at a given item, Nestr layers the rules in this order:
Within each layer Nestr merges using the most permissive value. Across layers, more specific rows (a label-specific row) still win over less specific ones (a type wildcard or “All nests”). A “No” on a specific row will block a “Yes” on a broader row in the same profile, so use specific denies sparingly.
If you set a row to Default, Nestr falls back to its built-in behaviour for that operation. Default is not the same as “No”: it is “let Nestr decide as it normally would”.
When AI agents fill roles in your workspace, the same model that lets a human stay in their lane lets an agent do the same. Permission profiles are role-based access control by construction: an agent inherits rights only from the role it currently fills. The role definition shapes what it should do. Rights management enforces what it can do. The combination prevents role bleed, the failure mode where an agent acts well past its assignment simply because nothing technical stopped it.
This matters more for agents than for humans because the drift can happen in a single session and at machine speed. By the time anyone notices, the agent has read data it should not have, created items in places it had no business creating them, or assigned people to roles outside its authority. Tying every permission to a role and revoking it on unassignment gives you scoped credentials per agent identity, evaluated on every action, with the same audit trail as human work.
For the wider picture see Agent governance and Permission creep.
What is the difference between workspace admin and a permission profile?
Workspace admin is the built-in highest-privilege role. It configures applications, integrations, billing, and the rights model itself. A permission profile is a named bundle of fine-grained CRUD rights you build in the editor. Profiles let you delegate specific powers without granting full admin.
What happens when a user is unassigned from a role?
Rights granted through that role are revoked immediately. If the same user holds the same rights through another role in the same circle, those are kept. Rights assigned directly on the workspace users page are kept too. Only the rights granted by the role they stepped out of are removed.
Can permission profiles control what AI agents can do?
Yes. AI agents fill roles in Nestr the same way humans do, and they pick up the permission profile attached to that role. If a role’s profile lets the filler create projects in one circle but only read in another, an AI agent in that role inherits exactly those boundaries.
How does this compare to access control in other self-organisation tools?
Most self-organisation tools treat permissions as a fixed three-tier model: member, admin, owner. Nestr’s rights management is a full permission profile editor with per-label and per-field grants, four scopes, tri-state values, row-level limits, and profiles that stack via role assignment. The result is role-based access control customised to your structure, not a coarse permission switch.
Connect a Slack workspace to a Nestr workspace and keep conversation, governance, and meeting activity in sync across both tools. Once mapped, channels in Slack mirror the Nestr item they’re connected to.
From Nestr to Slack:
From Slack to Nestr:

Sync only flows to or from channels that are mapped. There are two levels of mapping: a workspace-level default and per-circle.
Pick a channel from the Default Slack channel dropdown. Activity without a more specific mapping goes there. The Nestr bot is auto-joined to the channel as soon as you pick it.
On the comments tab of any circle or project, click the channel-picker icon next to the comment input. Pick a Slack channel; mappings on a circle override the workspace default for everything inside that circle.

In the pop-up, select the circle specific Slack channel and save.
You can also opt to include/exclude sub-circles. When turned off, you won't get any updates specific to any sub-circles. If a sub-circle has their own channel defined, those messages won't show up in the super-circle regardless.

If you opt to silence a circle’s channel, its comments are not synced anywhere. They also do not fall through to a super-circle’s channel or the workspace default channel. Use this to keep a circle’s conversation out of Slack entirely.
Private channels are hidden from Nestr until the bot has been let in. Slack only shows the Nestr bot the private channels it is a member of, and a Slack security policy stops bots from joining private channels on their own. Until the bot is invited, the channel will not appear in Nestr’s channel picker.
To link a private channel:
/invite @Nestr. Any member of the channel can do this.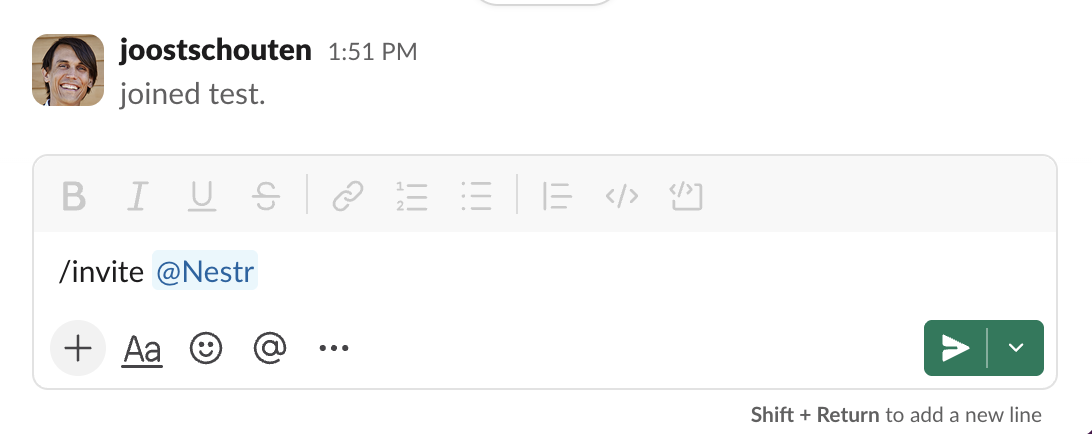
Comments you post in Nestr show up in the matching Slack channel as a message under your name and avatar. If a comment in Nestr is a reply to another, it shows up as a thread reply in Slack on the right parent message.
Governance and meeting events ship with action buttons next to the message: Join meeting on a started meeting, View summary on a closed one, No objections / Escalate to meeting on a proposal. Click and the action runs in Nestr.
Messages posted in a mapped Slack channel show up as comments on the corresponding Nestr item. Replies to a Slack thread come into Nestr as replies to the right comment.
If a Slack user’s email matches a Nestr user in the workspace, the comment is attributed to that Nestr user (their name and avatar). If not, the email shows as the author so it’s still clear who posted.
Click Disconnect in workspace settings. Existing comments stay in Nestr but new comments stop syncing in either direction.
Nestr can import your organisational structure from Peerdom. Circles, roles, accountabilities, domains, projects and users are all brought across so you can continue where you left off.
To get started, create a new workspace or head into an existing one. Navigate to the workspace settings page.

Once there, navigate to the 'Integrations' tab and enable the Peerdom integration.

You will need your Peerdom API key.
To get your API key, log into Peerdom and navigate to your organisation settings. Copy the API key.
After entering both values in Nestr, you can choose your import options:
Click Synchronize to start the import. Depending on the size of your organisation, this may take a few seconds to several minutes. You can let it run in the background.
To update your data after changes in Peerdom, simply click the Synchronize button again and Nestr will import the latest changes.
After importing your data from GlassFrog, Holaspirit, or Peerdom, there are a few things to check and set up to make sure everything is working as expected.
Role assignments won't come through if you opted not to import the users. In that case, manually add them and assign the right user to roles:

Occasionally you might want to take the oppertunity to make some changes during your transfer of data and move roles/circles around. In that case:
After a successful import, complete your setup:
The GlassFrog, Holaspirit, and Peerdom integrations all support re-sync. Click the sync button in Workspace settings → Integrations to pull in the latest changes from your source platform. This is useful if you're running both tools in parallel during a transition period.
If you have your records in excel or another format contact the Nestr team and we'll import it manually for you. We can even import a hand drawn picture with some circles on it.
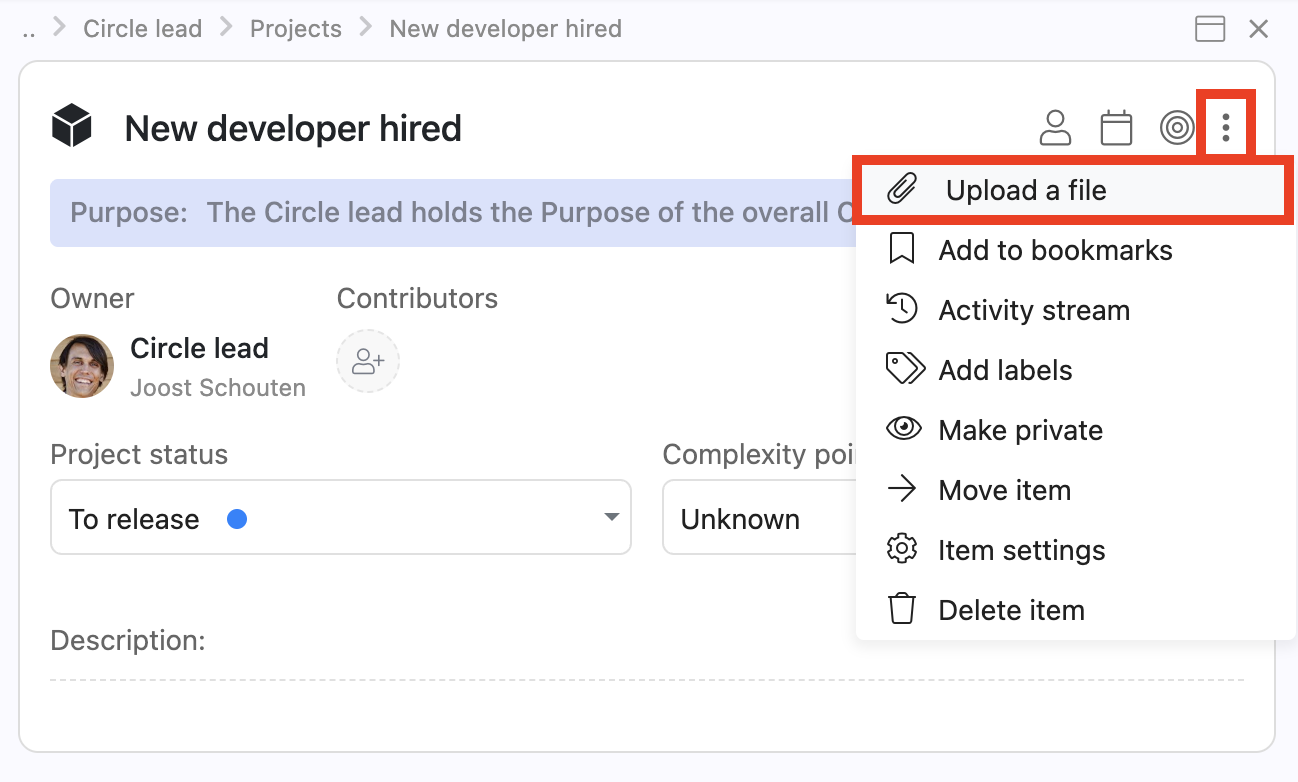
Nestr allows you to attach files and documents to various items throughout your workspace, keeping information connected to the work it relates to.
Files can be attached to:

You can also use the context menu to attach files which will open your file explorer.
Uploaded files appear as clickable icons. Depending on the file type:

For documents stored in external systems (SharePoint, Google Drive, Notion, etc.), you can paste links directly into descriptions, comments, or notes. The link will be clickable for anyone with access to the external document.
Tip: Use a consistent approach for your team — either upload files directly to Nestr for centralised storage, or link to external documents for single-source-of-truth workflows.
Nestr supports common file types including documents (PDF, DOCX, XLSX), images (PNG, JPG, GIF), and presentations (PPTX). There are file size limits per upload — for very large files, consider linking to an external storage service instead.
Your Nestr profile is visible to colleagues across all your workspaces. Keep it up to date so your team knows who you are.

Not receiving the verification code? Check your spam/junk folder. If it still doesn't arrive, try using a different email provider or contact support.
Nestr is available in multiple languages. To change your interface language:
The interface will update immediately. Note that user-generated content (role names, project titles, etc.) stays in whatever language it was written in.

At the bottom of your setting page you can also create new personal API keys and review all API access granted to other tools. For example if you have enabled AI bots access to your account. You can manually create a new key to use or you can revoke access of tools you wish to no longer have access to your account (note that this will result in these integrations failing if they are still active).
Nestradamus is Nestr's built-in AI assistant. It helps you navigate self-organisation, answers how-to questions about the platform, and can carry out work in your workspace on your behalf. Nestradamus is part of the Agentic work app, which is on by default.
Message Nestradamus directly from the chat icon in the bottom right corner of any page, or bring it into a conversation with an @mention. It replies in the conversation, the way a colleague would.
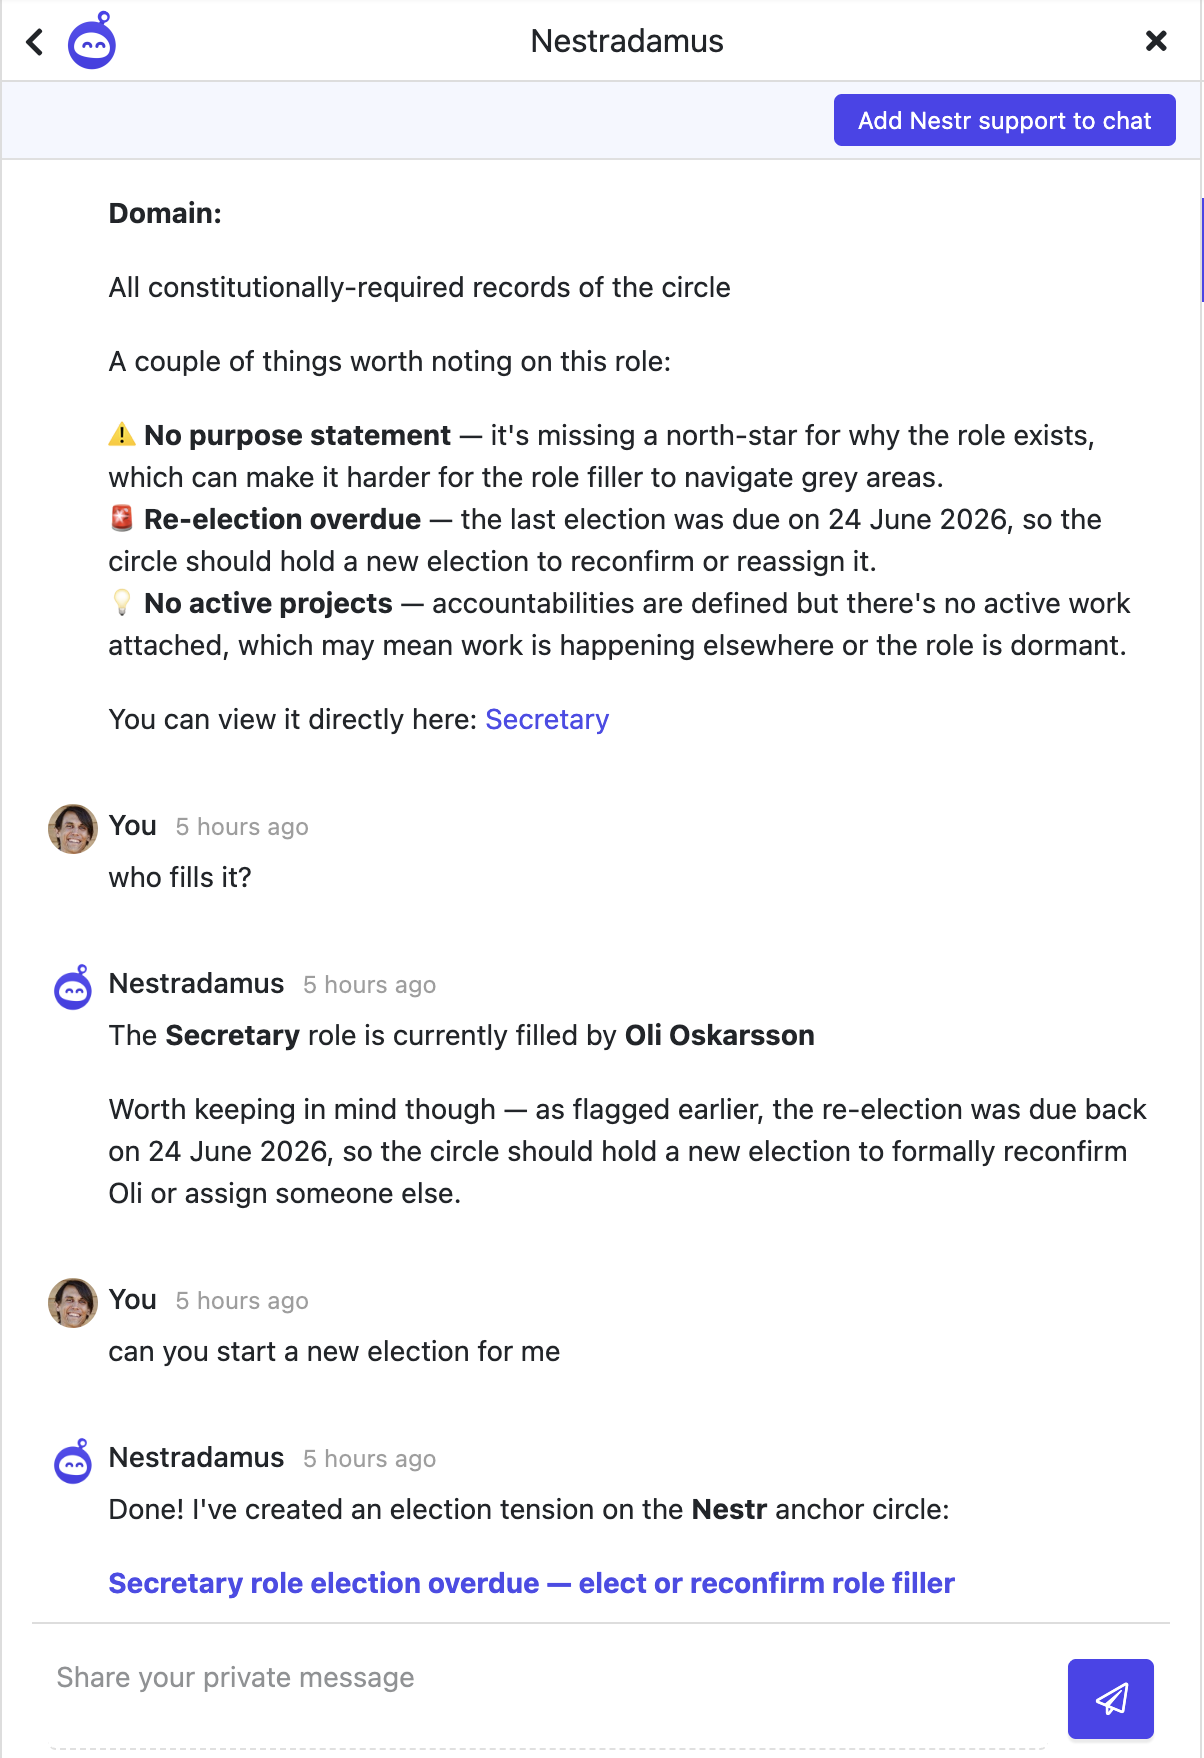
Nestradamus comes with the Agentic work app, which is on by default for every workspace, so it is usually ready to go. Its ability to act on your workspace data is granted by enabling the Agents integration, which connects Nestradamus to your workspace over MCP. Answering how-to questions about Nestr is always free; having Nestradamus work against your workspace data draws on your workspace's AI credit. For enabling, AI credit, and context files, see the Agentic work app.
Rather than starting from a blank workspace, ask Nestradamus to help you set up. Tell it you would like help creating a starting structure, and it will ask you a few questions first, about your organisation's purpose, the work you do, and how your teams are organised, before proposing an initial set of circles and roles.

Nestradamus works inside Nestr. To connect an outside AI assistant such as Claude, Cursor, or VS Code to your workspace, see the MCP integration.
Accidents happen. Someone deletes a role, a circle, or a proposal by mistake. Nestr provides several recovery mechanisms depending on how recently the deletion occurred.
When you delete an item, Nestr provides an undo option in the activity stream. This is your first line of defence:

Time limit: The undo feature is available for a limited window (typically 24 hours) after deletion. After that, the undo link expires.
You also get an undo straight after deleting: a message appears with an Undo button that restores what you just removed. This works for bulk deletes too, where one click brings back the whole batch. See Bulk actions.
If the undo window has passed or the undo link doesn't work:
Your data is always yours. Nestr provides multiple ways to export and back up your organisational data. This guide expands on the export options covered in Importing and exporting data.
label:role for all roles, label:project for all projects).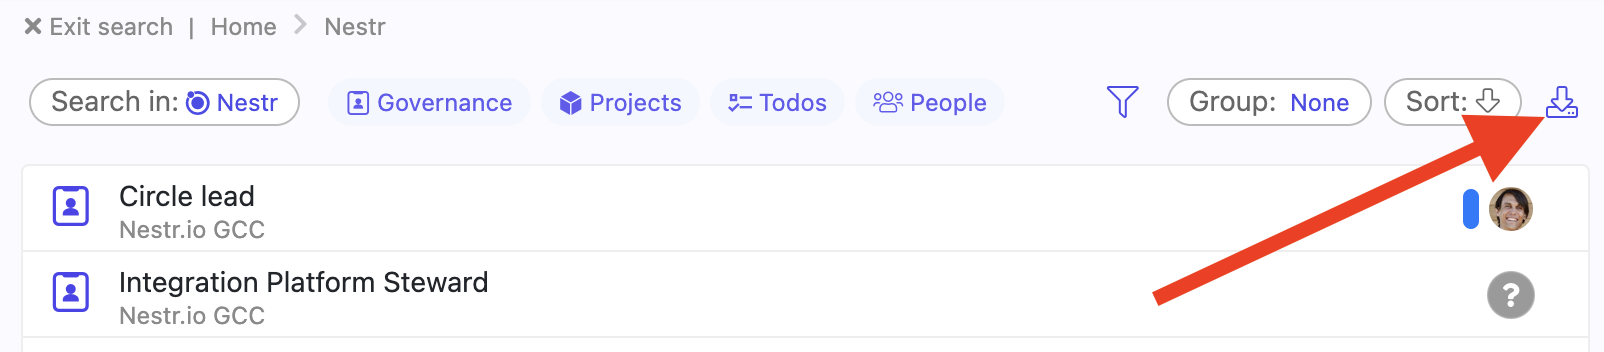
To export a hand-picked set instead of everything in the results, select the items you want and choose Export from the With selected menu. See Bulk actions.
Most tabs (Projects, Roles, etc.) offer an export button in the view controls. This exports the items currently displayed in that view.
To export a whole workspace
For comprehensive or automated exports, use the Nestr API. The API gives you access to all workspace data in JSON format, including governance records, project history, and role structures.
Nestr is built to support multiple self-organisation frameworks. Whether you practice Holacracy, Sociocracy, Sociocracy 3.0, or a custom approach, Nestr adapts to your governance rules.
When setting up your workspace, a workspace admin chooses the governance model in Workspace settings → Applications under the Self Organisation app:

Nestr's governance meetings follow the Holacracy facilitation process:
Holacracy tactical meetings include: check-in → checklist review → metrics review → project updates → tension processing → closing.
Electable roles (Facilitator, Secretary, Rep Link) can be filled through the Hold election option in a governance proposal. The election follows the IDM (Integrative Decision Making) process.
Each circle automatically gets: Circle Lead, Facilitator, Secretary, and Rep Link. These follow the Holacracy constitution definitions.
When Sociocracy is selected, governance proposals use a consent process: the proposal is shared, members can raise objections (not just disagreements — reasoned objections that the proposal would cause harm), and the group integrates objections until consent is reached.
For proposals that don't need a meeting, use Propose now to run an asynchronous consent round. Each circle member responds with "No objections" or "Escalate to meeting". See Tensions & governance proposals for details.
Sociocratic rounds (speaking in turn) are supported through the check-in and reflection tabs in meetings.
A delegate circle brings together representatives from multiple circles. To set one up in Nestr:
In workspaces with governance enabled, structural changes (new roles, modified accountabilities, etc.) are routed through the governance proposal process. Non-admin users will see "Create proposal" instead of direct creation buttons, ensuring changes go through the consent process.
[SCREENSHOT #4]
Nestr can connect with the tools you already use. This guide provides an overview of integration options, from no-code platforms to custom API development.
These integrations are configured directly in Workspace settings → Integrations:
[SCREENSHOT #1]
Use Nestr's API with Zapier or Make (formerly Integromat) to create automated workflows:
To set up, you'll need your API key (see Using the Nestr API) and the Nestr API endpoints from our API documentation.
Nestr does not currently have a direct Google Calendar integration. Meetings in Nestr are managed within the platform. You can manually create calendar events and link to your Nestr meeting.
There is no direct Microsoft Teams integration. You can use the API via Make or Zapier to bridge data between the platforms.
For tools without a built-in integration, contact us and we'll help import your data, or use the API to build a custom sync.
Nestr's REST API gives you full programmatic access to your workspace. See Using the Nestr API for authentication details and the API documentation for available endpoints.
Nestr's pricing is designed to be accessible to organisations of all sizes, from small teams experimenting with self-organisation to large enterprises.
Anyone with login access to your workspace counts as a user. This includes:
Users who have been invited but haven't yet accepted ("silent" users) or who have been suspended do not count toward your user total.
If you want stakeholders to see your organisational structure without participating, you have two options:
Every new workspace starts with a free trial period. During the trial, you have access to all features. When the trial ends, you can choose a plan that fits your needs or contact us to discuss options.
Nestr offers special pricing for nonprofits, NGOs, cooperatives, and social impact organisations. Contact us to learn about discounted plans tailored to purpose-driven organisations. Nestr operates with a pay-what-you-can approach for qualifying organisations. We believe everyone should have access to tools for effective self-organisation, regardless of budget. Reach out to discuss what works for your situation.
Pricing is per workspace, not per user across all workspaces. If you have multiple workspaces, each has its own plan and user count. A person who is a member of multiple workspaces counts as one user in each workspace.

For billing questions or invoice requests, contact our team.
Custom fields let you add the exact data your organisation needs to any type of item. Configure a field once on a label and every item of that type gets it automatically. New to labels? Start with The power of labels. To set objectives and key results, see the OKRs app.
Labels can carry custom fields, letting you add structured data to any item type. Custom fields are configured at the label level, so every item with that label automatically gets those fields.

For example, add a project status dropdown to your project label, and every project will carry a status you can group and filter by.
Choose the type that matches the data you want to capture:
You can add fields to the workspace labels you create yourself, and to Nestr's built-in labels such as project, role or circle. Customising a built-in label extends it with your own fields without changing what it already does.
Fields you set at the workspace level apply everywhere that label is used. A circle can then customise the same label for itself, adding a field or hiding one it does not need, and a circle nested inside it can customise again. Each level inherits from the one above and can override it, so a team can tailor a label to its own way of working without changing it for everyone else.
Welcome to Nestr! Whether you're setting up self-organisation for the first time or migrating from another tool, this guide will get you productive in your first week.
[SCREENSHOT #1]
For more detail, see Setting up a new collaborative workspace.
For details, see Building your org structure.
Point new members to Invited into a workspace? How to get started.
For the full guide, see Running meetings in Nestr.

See Projects & todos for the complete guide.
TermMeaningWorkspaceYour organisation or team's home in NestrCircleA self-governing team that contains roles and can nest within other circlesRoleA set of responsibilities with a clear purpose, accountabilities, and domainsTensionA gap between current reality and what could be — the driver of organisational changeGovernanceThe process of evolving your structure through proposals and consentProjectA multi-step outcome tracked under a roleTodoA single next action, can be standalone or nested under a projectKanban boardVisual board showing projects by status: Future, Current, Waiting, Done
Once your workspace is created, you can configure it to match exactly how your organisation works. Nestr doesn’t force a single way of working on your team — instead, the Applications tab lets you pick and choose the features that make sense for you. Whether you practise Holacracy, Sociocracy, or your own flavour of self-management, you enable only what you need and leave the rest off.
This guide covers the key workspace settings, with a focus on the Applications tab.
Only workspace admins and owners can access most settings.

Every organisation is different. Some teams run full Holacracy with tactical meetings, governance proposals, and metrics. Others just need a simple project board and a few notes. The Applications tab is where you make Nestr yours — toggle features on or off so the interface shows only what your team actually uses, with no clutter from features you don’t need.
Each application has a simple on/off switch. Some apps reveal additional configuration options when enabled. You can change these settings at any time — enabling an app makes it available across your workspace, and disabling it hides it without deleting any data.
Some of the applications above are grouped under Self Organisation. When you enable Self Organisation, it unlocks access to Default Circle Roles, Domains & Policies, Circle Meetings, Checklists, Metrics, and Insights. You can then toggle each sub-app independently — for example, you might use Circle Meetings and Metrics but leave Checklists off.
The Integrations tab contains apps that connect Nestr to external tools and services, such as API access, SCIM user provisioning, SAML single sign-on, and more.
You can be a member of multiple workspaces. Switch between them using the workspace selector in the left sidebar. Each workspace operates independently with its own settings, members, and governance structure.
To create a new workspace, click Add workspace in the workspace selector.
Only the workspace owner can delete a workspace:
Warning: This action is irreversible. All workspace data, including roles, circles, projects, meetings, and governance records, will be permanently deleted.
This guide is for workspace admins setting up feedback. For how to give, request, and review feedback day to day, see Giving or requesting feedback.
Peer feedback matters in self-organising teams, where there is no manager handing down reviews. Nestr's Feedback app gives your team structured, role-based feedback.
Feedback is enabled by a workspace admin:
Once enabled, everyone in the workspace can give and request feedback, either for a person or for their work in a specific role.

You can create custom feedback forms to match how your organisation works:
Known issue: avoid using colons (:) in feedback form field names, as text after the colon may be cut off.
All feedback is accessible from My feedback in the sidebar:

Circle-level feedback is also visible in each circle's Work → Feedback tab.
If test feedback was submitted while setting up, you can delete individual feedback items from the feedback detail view.
Managing who has access to your workspace and what they can do is essential for effective collaboration. This guide covers inviting users, setting permissions, and managing your team in Nestr.
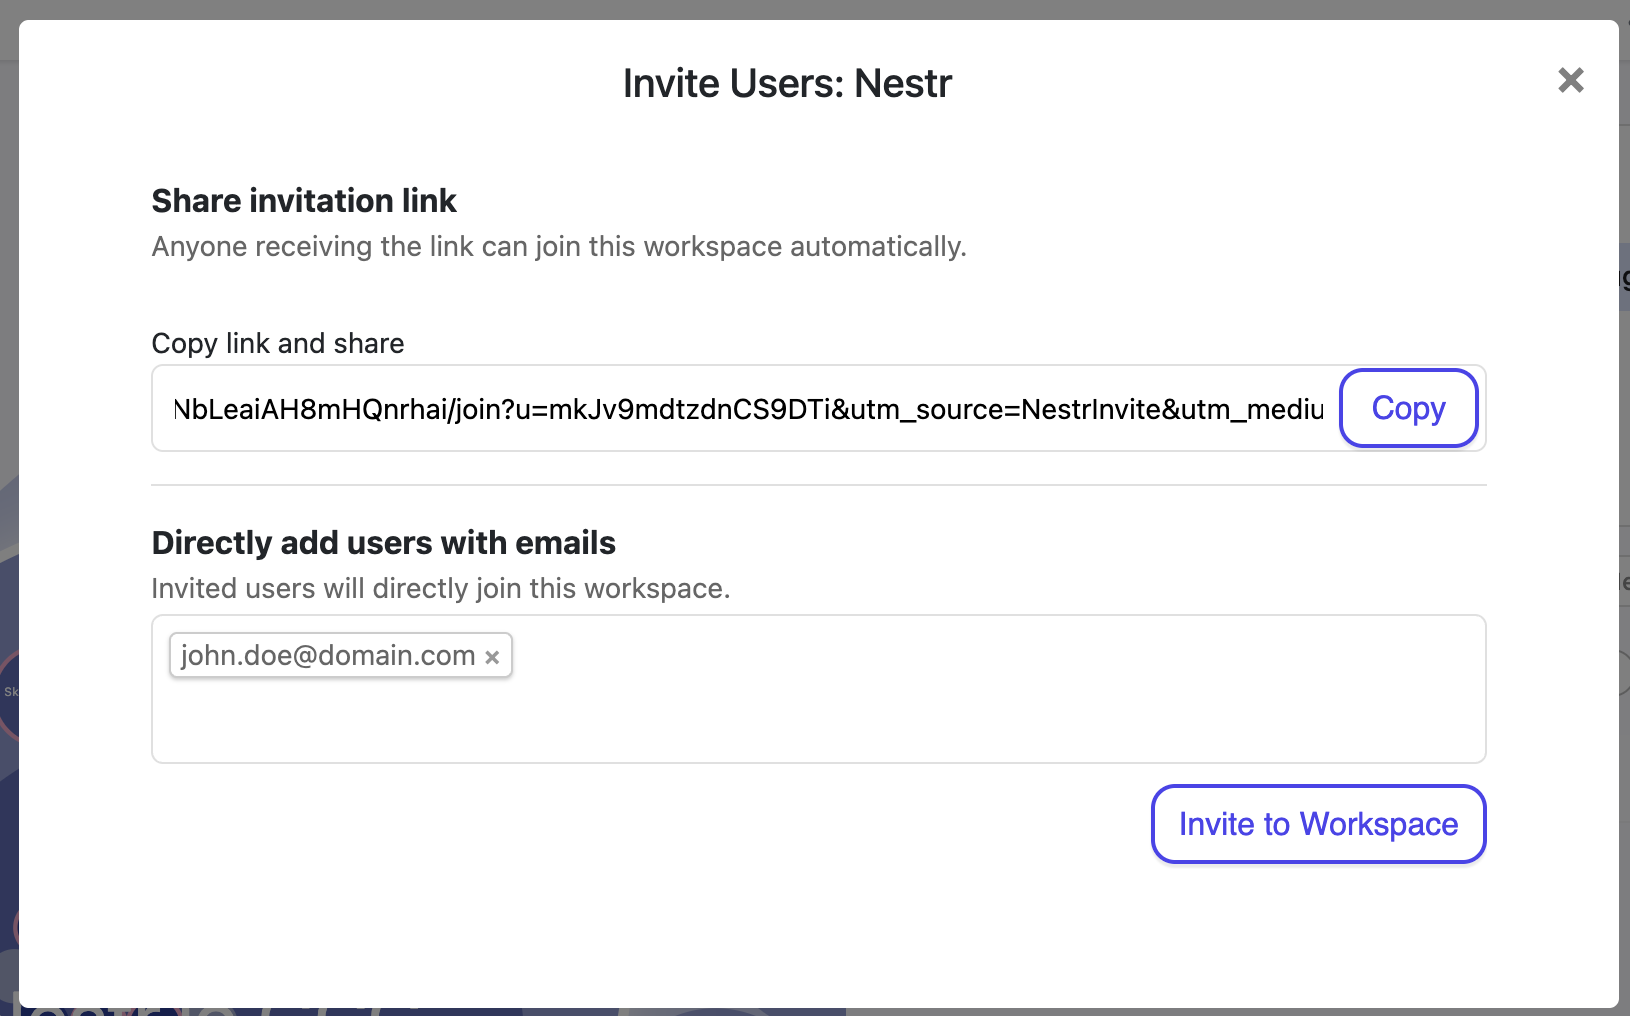
Only workspace admins can invite new users. There are three ways to invite people:

Each invitee receives an email with a link to join your workspace. There is a daily limit on invitations (typically 20 per day - contact us if you need this to be higher).
In the same invite dialog, you'll find a shareable invite link. Copy and share this link with anyone you'd like to invite. If admin approval is required, new users will need to be accepted before they gain access.
Nestr starts with three workspace-wide permission levels:
Beyond these three, Nestr lets you fine-tune what every member can see and do through named permission profiles. Profiles can be attached directly to a user from the workspace users page, or to a role so that whoever fills the role picks the rights up while assigned and loses them again when unassigned. See Rights management for the full picture.

Workspace admins can edit a member's full name and manage their email addresses from the same popup used to assign rights. Go to Workspace settings → Users and click a user to open their details.

Change the Full name field and click Save. The name is editable only for members who have at least one email on a domain your workspace owns and has verified. For everyone else the name is read-only, and the member changes it from their own profile.
Under Email addresses you can:
Two safeguards apply. A member always keeps at least one address, so the last one cannot be removed. Addresses on domains your workspace does not own stay read-only and show an info icon. This read-only state applies only to admins: members can always add, change, or remove their own email addresses from their account settings, including on domains the workspace does not own. For an admin to manage a member's address, add and verify the domain first under User Permissions & Domains (see Domain-based access below).
Only the current owner (or a super-admin) can transfer ownership:
After transfer, the previous owner retains admin rights but loses owner-level control.
The user is suspended from the workspace and unassigned from all active roles, projects, and tasks. They can be re-invited later if needed.
Any member can leave a workspace voluntarily:
If the email is on a domain your workspace owns and has verified, Nestr now claims the existing account and adds it to your workspace automatically, so this is no longer an error in that case. If more than one account matches that email, the request returns a conflict (409) and you choose how to resolve it. For an email on a domain you do not own, the person already has a Nestr account: ask them to log in with their existing credentials, then invite them by email.
The invitation may not have been accepted yet, or the user may be in a suspended state. Check the Users tab for their status and resend the invite if needed.
For organisations with a company email domain, you can configure automatic access:
Newly added domains start as Pending verification and must be verified by Nestr before auto-join and the other domain features take effect. See Verifying your workspace domain.

Workspace-scoped permission profiles can attach to new members automatically when they join through a matching domain or an invite link. See the auto-apply section in Rights management.
New to self-organisation in Nestr? Start with Structure & Governance in Nestr to understand roles, circles, and governance basics.
An agenda-item or tension is a gap between how things are and how they could be. In Nestr, tensions are the engine that drives organisational evolution. They can surface operational needs ("I need help with this project") or structural ones ("We need a new role for this work").
In Nestr these are the same, depending on your workspace settigns we'll change the wording to better align with the organisational norms. If you use Holacracy, Nestr will speak about tensions where for all other forms of Role-based work, we asddress them as agenda items. They are designed to help you move from a sensed issue or opportunity to a desired outcome, even if the outcome.

Once created, the new agenda item/tension will open. There you can:

Governance proposals let you change your organisation's structure: create, modify, or remove roles, circles, accountabilities, domains, and policies. Create the tension/agenda item just as mentioned above. But rather then creating it as an oporational tension or capturing output, select the governance option:

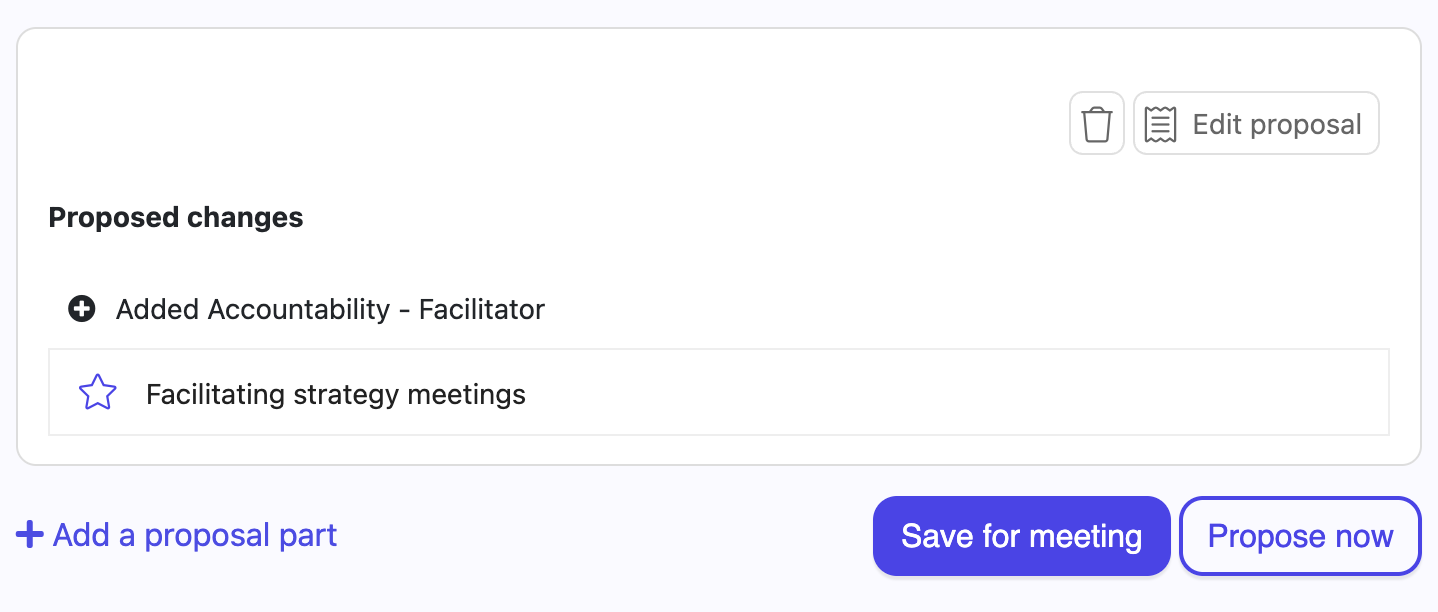
When creating or editing a role or circle, the role/circle we show completely editable. Set the title, purpose, accountabilities and domains to what they need to be. It does not need to be perfect, if the proposal get's you one step closer to resolving your tension/agenda item, it is ready for proposing.
Not that for roles, there is an "Apply template" drop down in the right top which allows you to apply any defined role template to your proposal. These are role templates defined in the workspace settings. The same drop down also allows you to copy any existing role in your organisation or create a Cross-link from another circle into this circle.

In the right top for each proposal part you can toggle between the edit and differences views so that you and your peers can review the actual changes made in the proposal parts.

Role elections are also part of the governance process. You can hold an election for any role that is marked as electable (set under advanced settings in the role proposal or set under 'item settings' if you are an admin for the workspace or circle).

When your proposal is complete, you can save if for the next governance/structure meeting, or you can propose it asynchronously. When you propose asynchronously, all circle members will get an email to invite them to respond. By default they will be presented with the differences view to draw their attention to only what you changed. They can ask questions and share reactions in the comments and click 'Escalate to meeting' or 'No objection' to consent. By default, if a user does not respond, it will be auto consented in 5 days. Once all members have consented or after the 5 day period has passed, the proposal will be adopted and your proposal will become part of your organisational governance.
To delete a tension you've raised:
Deleted tensions are soft-deleted and can be recovered from the activity stream in the circle.
In Nestr, work lives under roles. Projects track multi-step outcomes, while todos capture individual next actions. This keeps everything transparent: anyone can see what's happening without asking.


You can always create a new project using the '+ Create' button.

Important: Projects must be associated with a role. If you can't create a project, make sure you're assigned to a role first.
By default, Projects are displayed on a kanban board with a swim-lane per role and four columns representing project status:
Drag and drop project cards between columns to update their status. You can also click into any project card to see full details.
Both, My Projects and the circle project board is fully customisable. You can change the grouping (swim-lanes) to group

You can also choose one of the following view options to suit your needs

If you have admin rights, you can change the available columns on the project board. the simplest way is to click the settings icon on the group options.

This will open the circles 'Labels, Fields & Tabs' settings where you can change the project status options for the circle (and sub-circles). You can add/remove the columns and reorder to suit your needs.


Similair to projects, you can also create todos from the '+ Create' button in the navigation and from the circle/role Todos pages.
If you want to capture a todo as part of a project, the easiest is to open the project and find the 'Add new todo' section, click it and type the todo you want to capture and it will be created.

At the top of your My todos view, you'll find the Daily plan section. This is your personal focus list for today:

Both projects and todos support due dates. You can:
At the top of your page you will find a completed filter which let's you set how long you would like to see completed work for across Nestr. By default this is set to one week meaning you'll see completed work for one week after which it will be removed from your views. You can change this to a day, a month or turn it off completely so you can see all completed work.
This filter applies to work, OKRs and asynchronous proposals.

My projects shows all projects assigned to you across every role and workspace. You can group them by:
My todos works the same way, showing all your todos with grouping options:
You can sort todos by manual order, title, creation date, due date, or last updated.
When you need to change many projects or todos in one go, you do not have to open them one by one. In any list or search view you can select several items together and delete, move, complete or export them in a single action. See Bulk actions: select multiple items and update them at once.
A common question: "I created todos but they don't show in My Todos." This usually happens because:
Nestr structures your organisation around purpose using roles and circles rather than traditional job titles and departments. Each role has a clear purpose, accountabilities, and domains. Circles are self-governing teams that contain roles and can nest within each other.
This guide walks you through building and managing your organisational structure step by step.
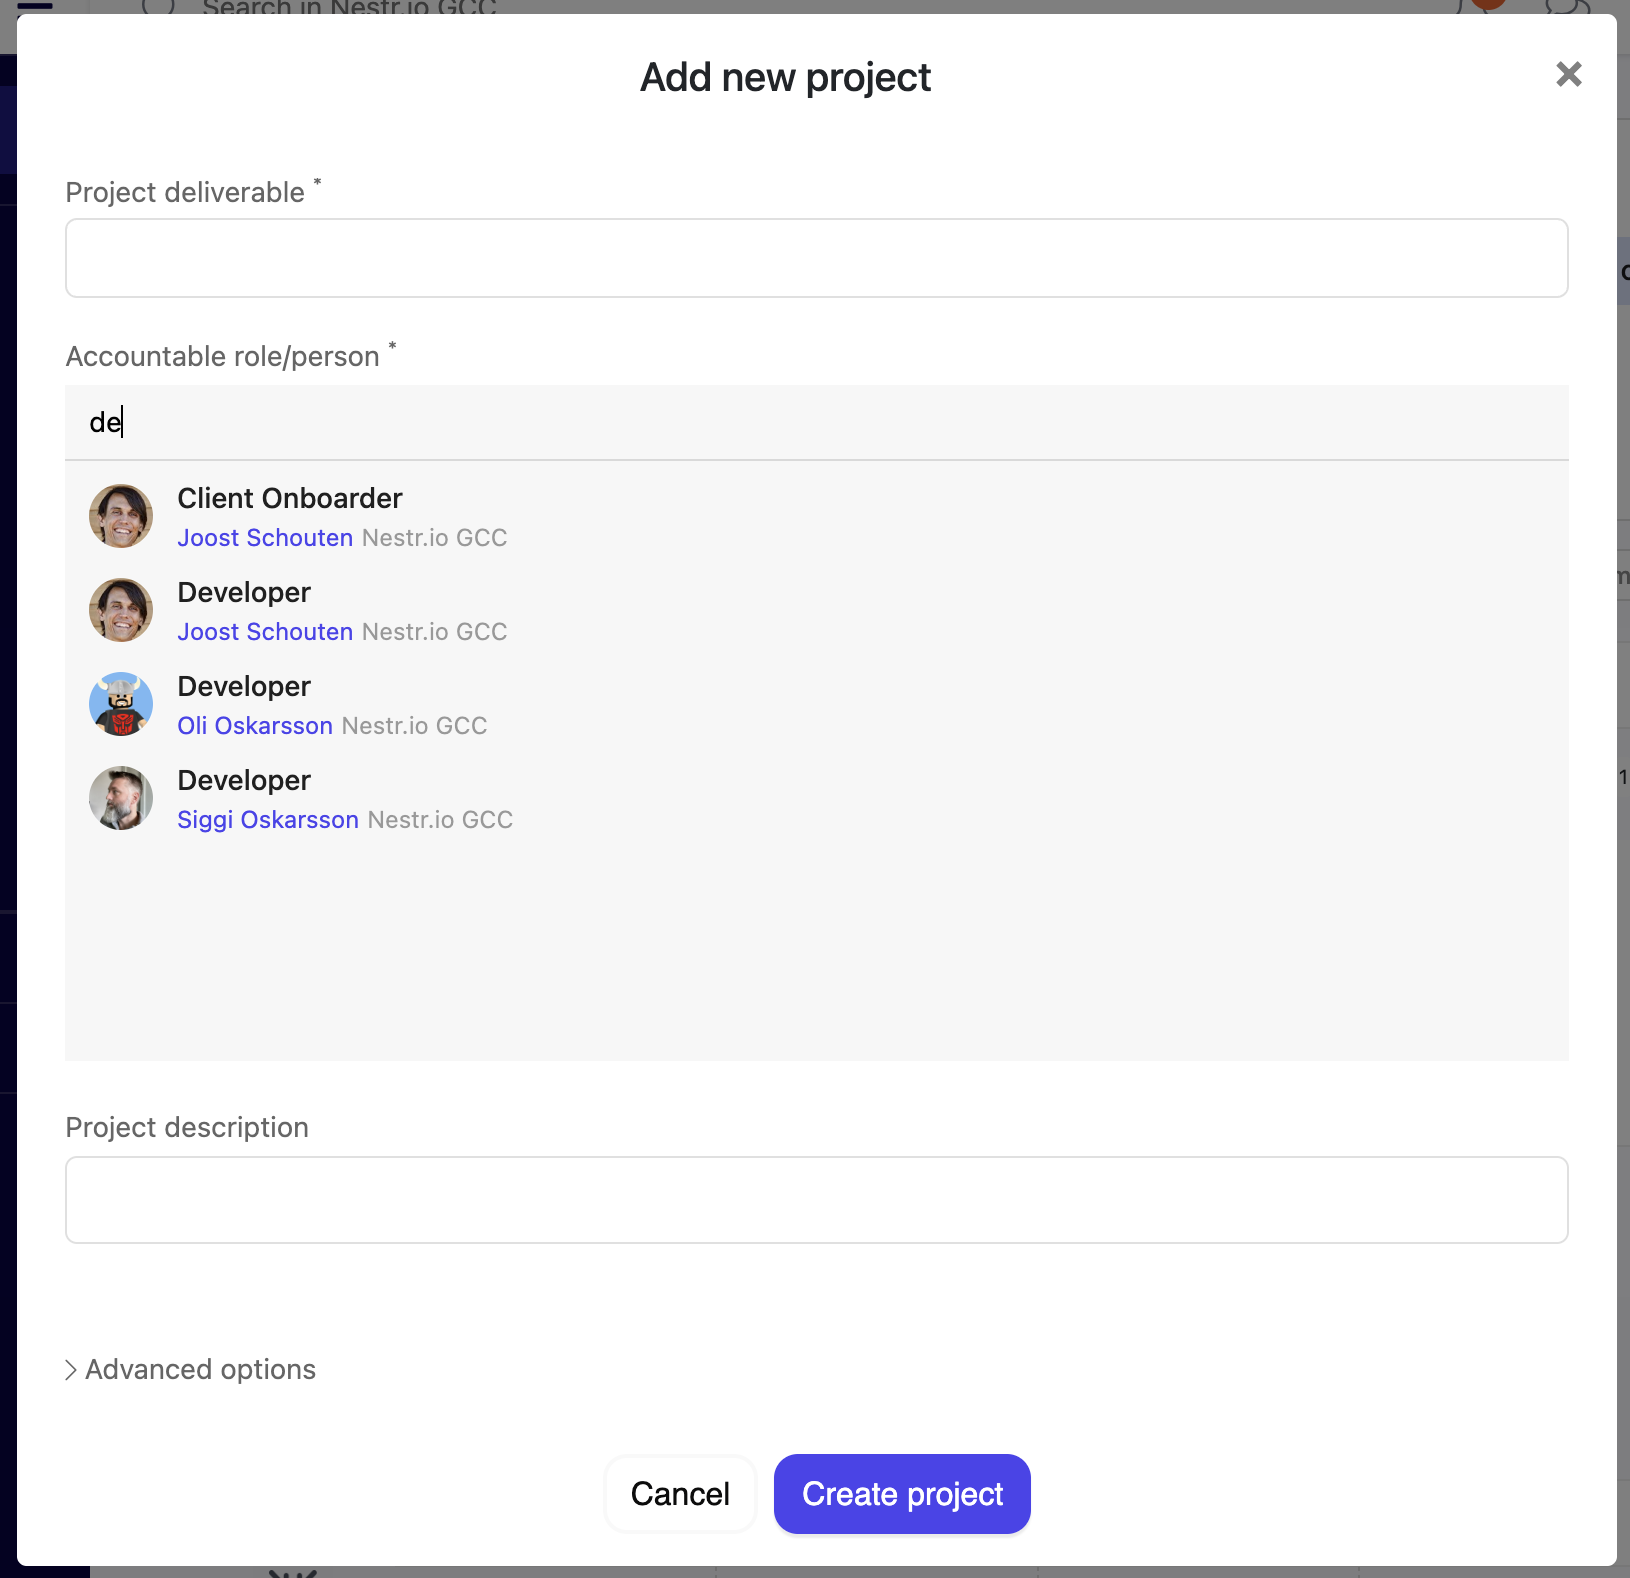
There are two ways to create a role:


Note: In workspaces with governance enabled, non-admin users may see Create proposal instead of Create role. This routes the role creation through the governance consent process so circle members can review it.
Circles are teams within your organisation that contain their own roles. To create a sub-circle:

When a new circle is created, Nestr automatically generates four core governance roles inside it (hese core roles can be changed under Workspace Settings -> Applications -> Core roles):
"Circle admin rights" is a configurable field on every role, not a fixed property of the four core roles. You can set it to any of the built-in shortcuts (Normal member, Circle admin, Role assigner, Circle plus sub-circles admin) or to any custom permission profile defined in your workspace. Whoever fills the role inherits the chosen rights inside the role’s circle and loses them again on unassignment. See Rights management.

You can also hover over any user's avatar in the role fillers widget on the left side of the Roles tab.

Alternatively you can also click the User icon in the top right and click the X in the pop-up and save to remove the user from the role.

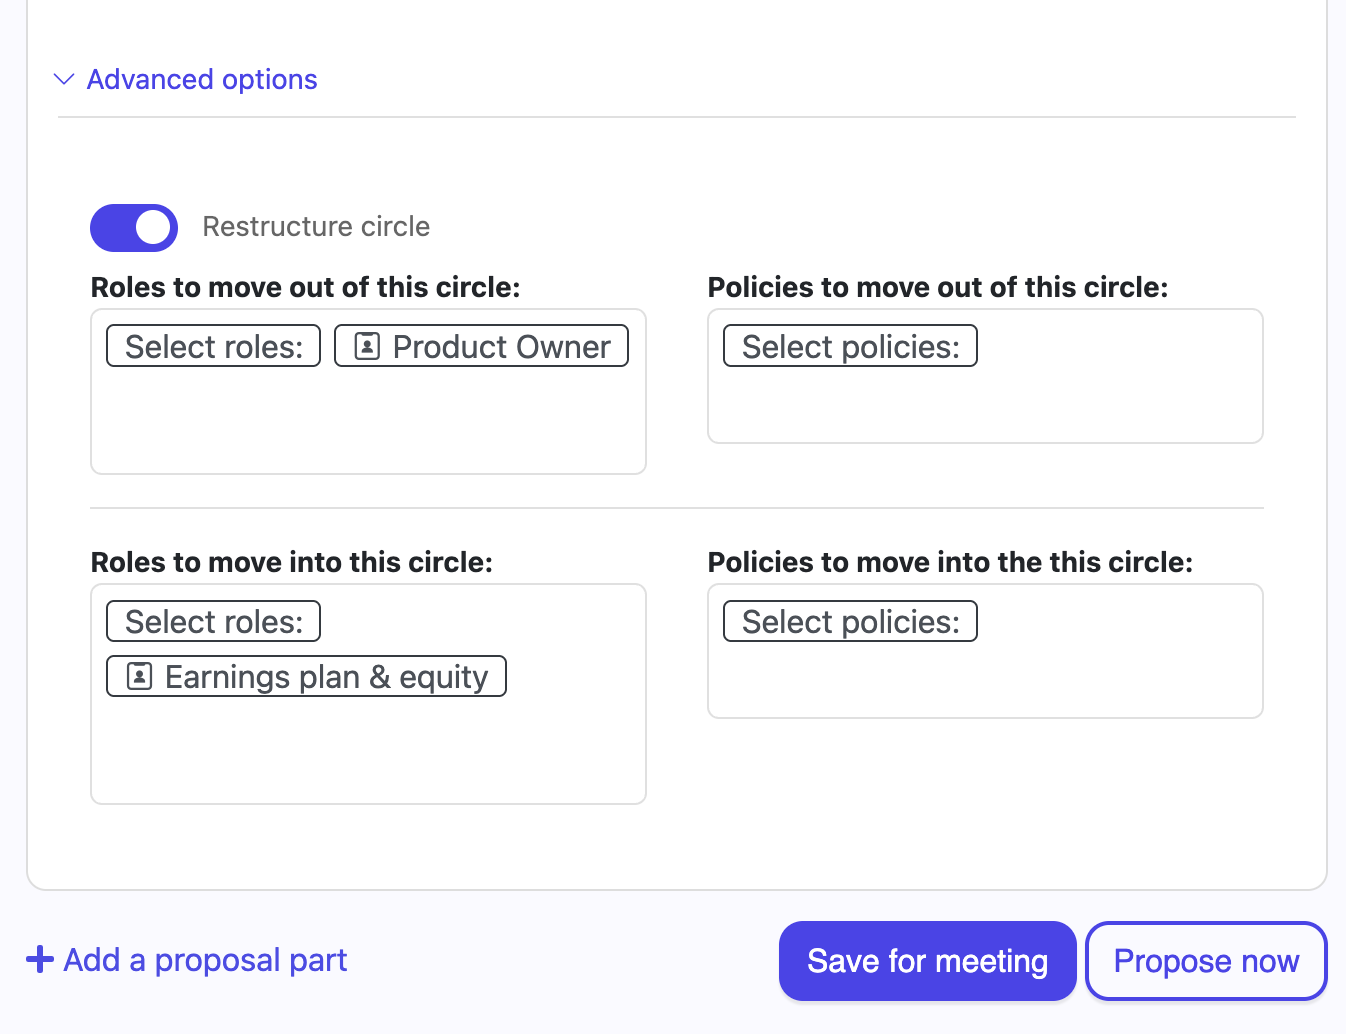
To move a role from one circle to another, you can change the role's parent circle. If you have admin rights, you can:

More appropriate is to use proposals so that all circle members can consent to the proposed move. through proposals you can only move a role up or down in the circle hierarchy one step at a time. To do this:

Every circle automatically comes with four core governance roles:
These are reasonable defaults you can change to suit your needs at Workspace Settings -> Applications -> Core roles. (requires admin rights)

To assign someone to a core governance role, navigate to the circle's Structure → About tab where these roles are listed, and assign users just like any other role.
Each role and circle can have domains (areas of exclusive control) and policies (rules granting or restricting access to domains):

In governed workspaces, changes to domains and policies go through the governance proposal process.
In Nestr, circle membership is determined by role assignment. When someone is assigned to any role within a circle, they automatically become a member of that circle. There is no separate "add member" action — membership flows from role assignment.
This means everyone in a circle has a clear reason for being there: they fill at least one role that contributes to the circle's purpose.
Meetings are the heartbeat of self-organising teams. In Nestr, structured meetings help your team coordinate work, process tensions, and evolve your governance — all in a focused, time-boxed format.
This guide covers everything you need to run effective meetings in Nestr: circle (tactical) meetings, governance meetings, and role meetings.
Nestr supports three types of meetings:

It is also possible to start a meeting using the '+ Create' button in your navigatiuon bar on the left.

If your workspace has both circle and governance meetings enabled, you may see a meeting type selector with radio buttons to choose between them.
Instead of starting a meeting immediately, you can schedule it for later:
Scheduled meetings appear in your Meetings tab with a countdown showing "Meeting starts in..." and a Start meeting now link if you want to begin early. Team members can add agenda items to a scheduled meeting before it starts.
Role meetings are not enabled by default. A workspace admin can enable them by navigating to Workspace settings → Applications and toggling on role meetings. Once enabled, who can start, edit, or close meetings can be tuned per role on the Pro plan through rights management.
Once enabled:
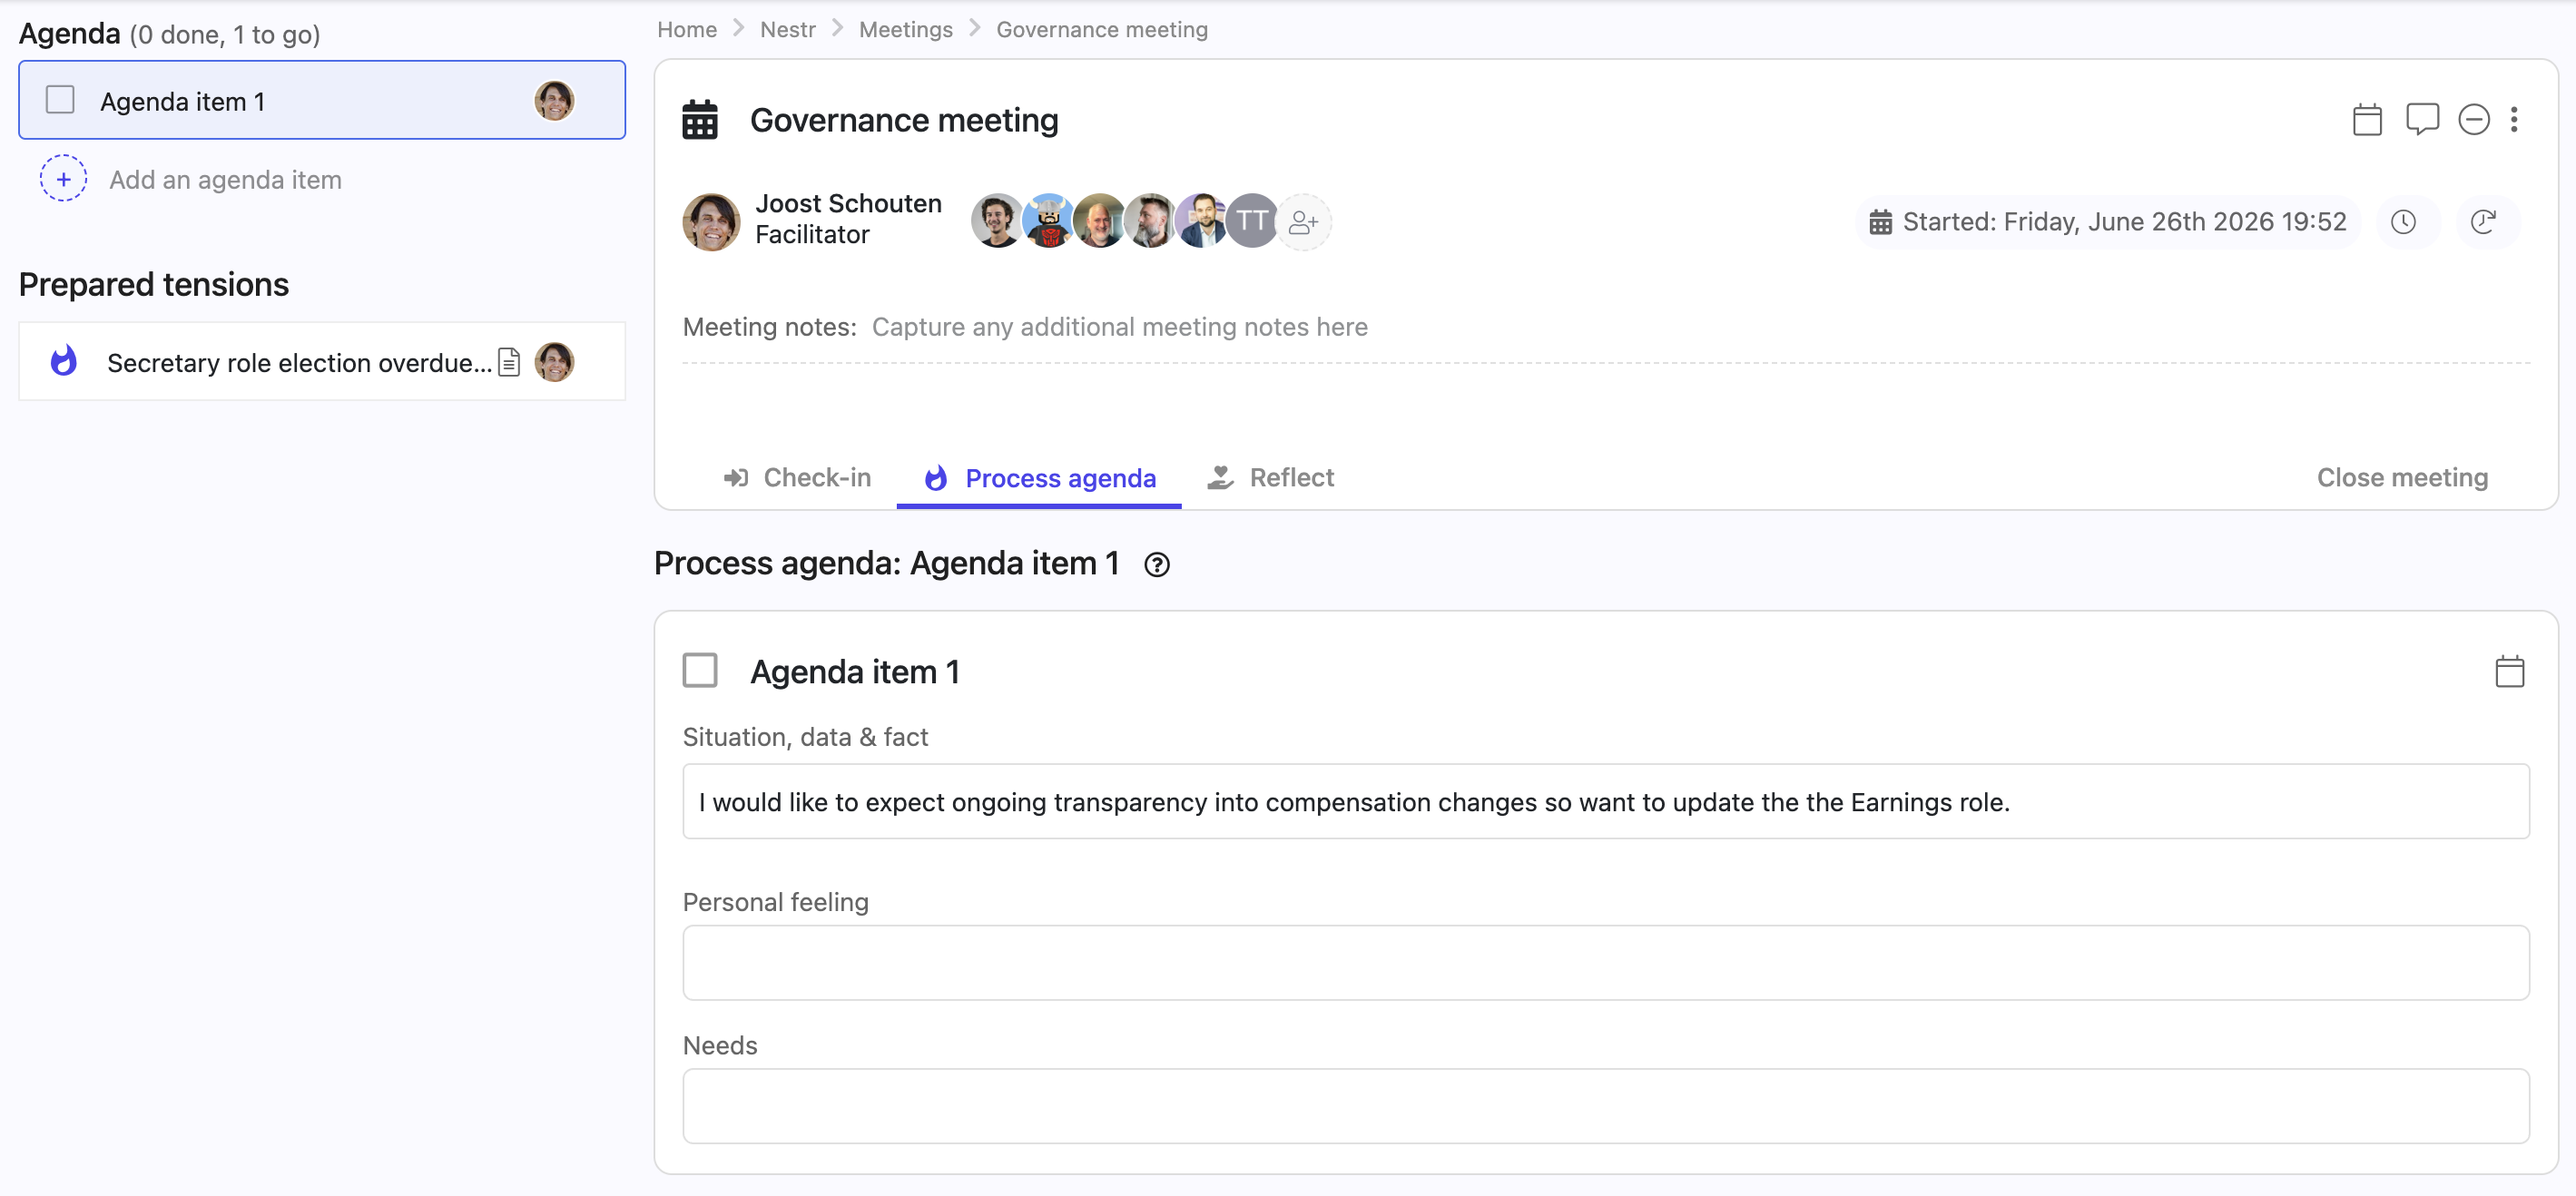
You don't have to wait until the meeting starts to add agenda items. Nestr lets you prepare tensions (agenda items) in advance:

Prepared tensions appear in a Prepared tensions list section below the agenda during an open meeting. You can add them to the active meeting by clicking Add to agenda, or remove them with Remove from agenda.
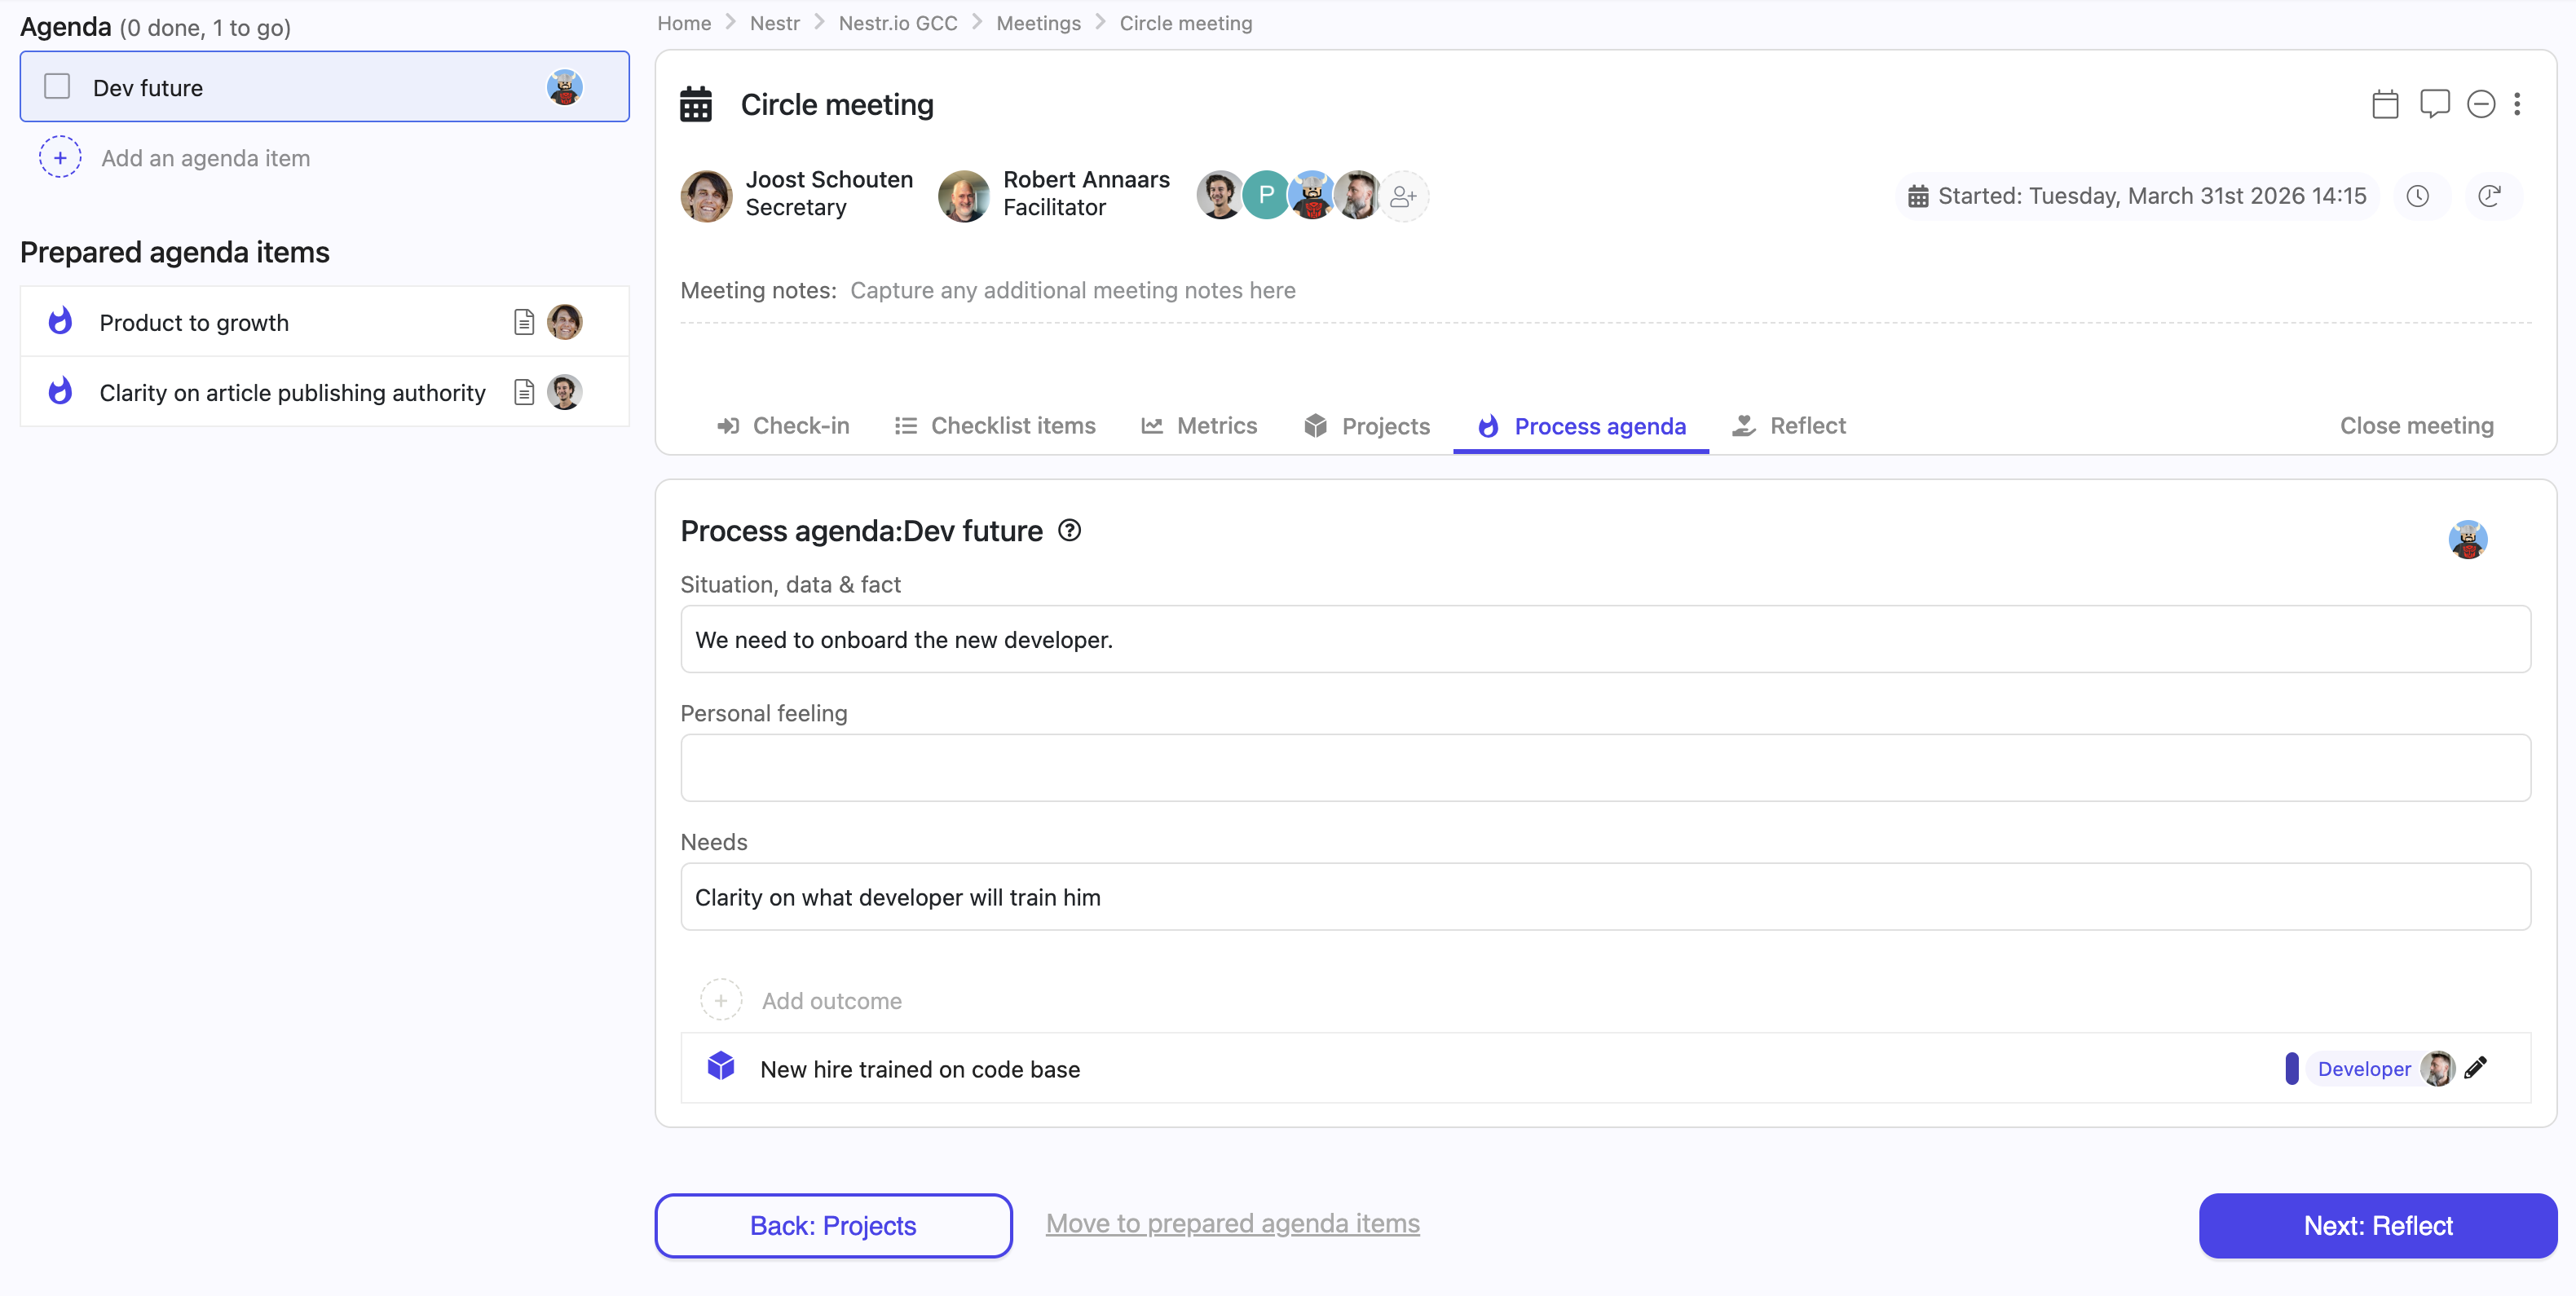
Once a meeting is started, Nestr guides you through a structured set of tabs. Here's what each step covers:
Governance meetings follow a similar structure but with a different processing step:

Anyone in the meeting can add agenda items to the meeting simply by typing in the 'Add an agenda item...' section in the left top. It will auto assign it to the user adding the agenda item. If there are prepared agenda items, you can simply drag them from the prepared list, onto the agenda to add them to the meeting. You can also open them from the prepared list, edit them if needed, and use the 'Add to agenda' button at the bottom to add them to the meeting agenda.
If you are capturing for someone else (if you are the Secretary for example), you can simply use @name... in the agenda item to assign it to another user. You can also use the ... when you hover over the agenda item and choose the Assign

You can remove an agenda item simply by backspacing the title of the agenda item and remove it from the meeting or you can use the context menu found under the ... on the item to remove it.

You can always drag the agenda items around to change the order in which they will be processed.
The Process agenda tab is where the real work happens. For each agenda item:
When all agenda items are processed, click the Close meeting tab to finalise:
Note: If a meeting is left open for more than 8 hours without activity, Nestr will automatically close it and send the email report.
Elections for governance roles (circle lead, facilitator, secretary, rep link) are handled as part of governance proposals. During a governance meeting, you can create a proposal with the election label to nominate and elect someone into a governance role. The election follows your workspace's configured governance process (Holacracy IDM, Sociocracy consent, etc.).
You can change the available steps for your meeting by navigating to your Workspace settings -> Labels, fields & tabs. There you can select the Circle or Governance meeting label and change what tabs are visible or add custom tabs.

The Model Context Protocol (MCP) is an open standard that allows AI assistants to connect directly to the tools and data they need. Think of it as a universal plug that lets any AI assistant — like Claude, ChatGPT, Cursor, or GitHub Copilot — talk to Nestr on your behalf.
Instead of copy-pasting information between your AI assistant and Nestr, MCP creates a live connection. Your AI assistant can read your governance structure, create projects, process tensions, manage your inbox, and much more — all while respecting your permissions and role authority.
Once connected, your AI assistant can help you with virtually everything you do in Nestr:
The Nestr MCP serves two distinct use cases:
AI-assisted self-organisation — You fill roles in your organisation and want an AI assistant to help you navigate governance, process tensions, manage projects, and stay on top of your work. The AI acts as your co-pilot, helping you be more effective in your roles.
Agentic work — AI agents can fill roles directly in your organisation. They energize roles, own accountabilities, process tensions autonomously, and communicate with other roles (human or AI) through Nestr's tension system. This makes agentic work scalable, auditable, and governed by the same rules as human work.
Connecting is simple. Most MCP-compatible AI clients handle the setup automatically.
For Claude Desktop, Cursor, VS Code, and other MCP clients:
https://mcp.nestr.io/mcpFor developers and custom integrations:
You can also connect using a workspace API key or a personal API key for programmatic access. See the authentication options on the MCP server page.
Connect your AI assistant to Nestr →
Once connected, try asking your AI assistant:
Your AI assistant will use the MCP connection to fetch live data from your Nestr workspace and help you take action — all within the authority of your roles.
The Nestr MCP is free to use for all Nestr users. Simply connect and start working smarter with AI.
One of the coolest new features of Nestr allows Decentralized Autonomous Organizations to link their existing DAO software to a Workspace, so you can track the DAO Proposals and use all the power of Nestr to manage them, like bind them to Projects, Tasks Circles or Roles, allowing one to track where the funds are being used and their status more clearly.
For now the types of DAO currently supported are: Aragon, DAOHaus and HyphaDHO.
You can start by creating a new Workspace, and selecting DAO:

If you already have an existing workspace you wish to integrate with your DAO, you will need to enable the DAO app by going to your workspace settings page by clicking the settings icon on the right top of your workspace.

On the workspace settings page go to the 'Applications' tab and enable the DAO app.
Then, after finishing the Workspace wizard or enabling the DAO app, your workspace is ready for DAO integration.
Next step is adding the DAO type, network and address, on the About tab:
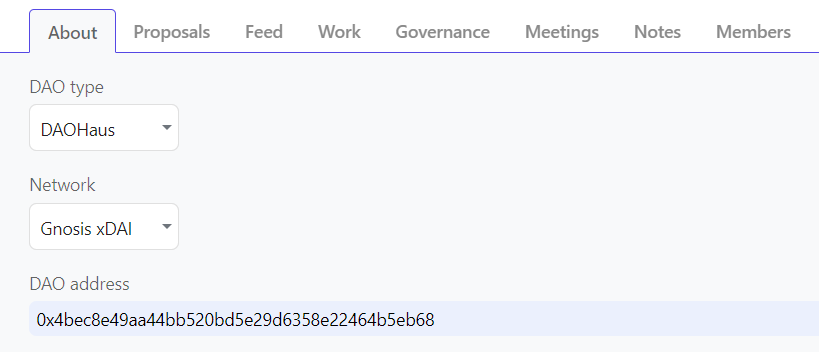
For ethereum based DAOs (Aragon, DAOHaus) you can use the 0x based DAO contract address, for Hypha DHO you should use the 12 character DAO account shortname that is usually on the DAO URL address.
After a few minutes, the DAO scrapper will scan the existing DAO proposals and show them on the Proposals tab:
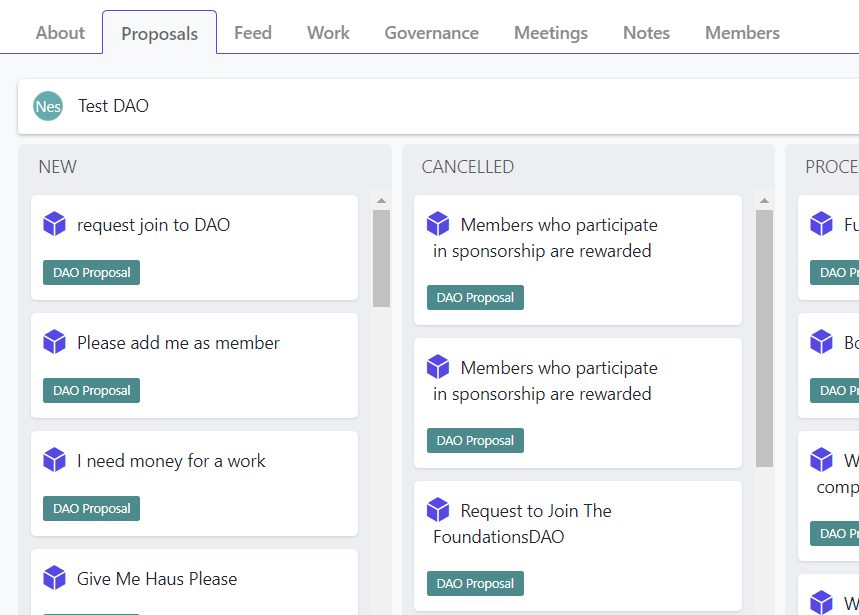
If you click on a Proposal you can see all blockchain details for them, like requested tokens, assignee, number of votes, etc. And you can also click the link the visit the original proposal on the DAO:

Now you can click on any Proposal and move them inside an existing Role or Project, like this:
Then your proposal will show like this:
You can also see the proposal attached to the Project if you click inside it:
This allows you to track the usage of the DAO resources tied to a Project or Role, to give more clarity and accountability!
Nestr has a Discord bot integration that allows you to post messages to a Discord channel from within Nestr. Here's how you do it:
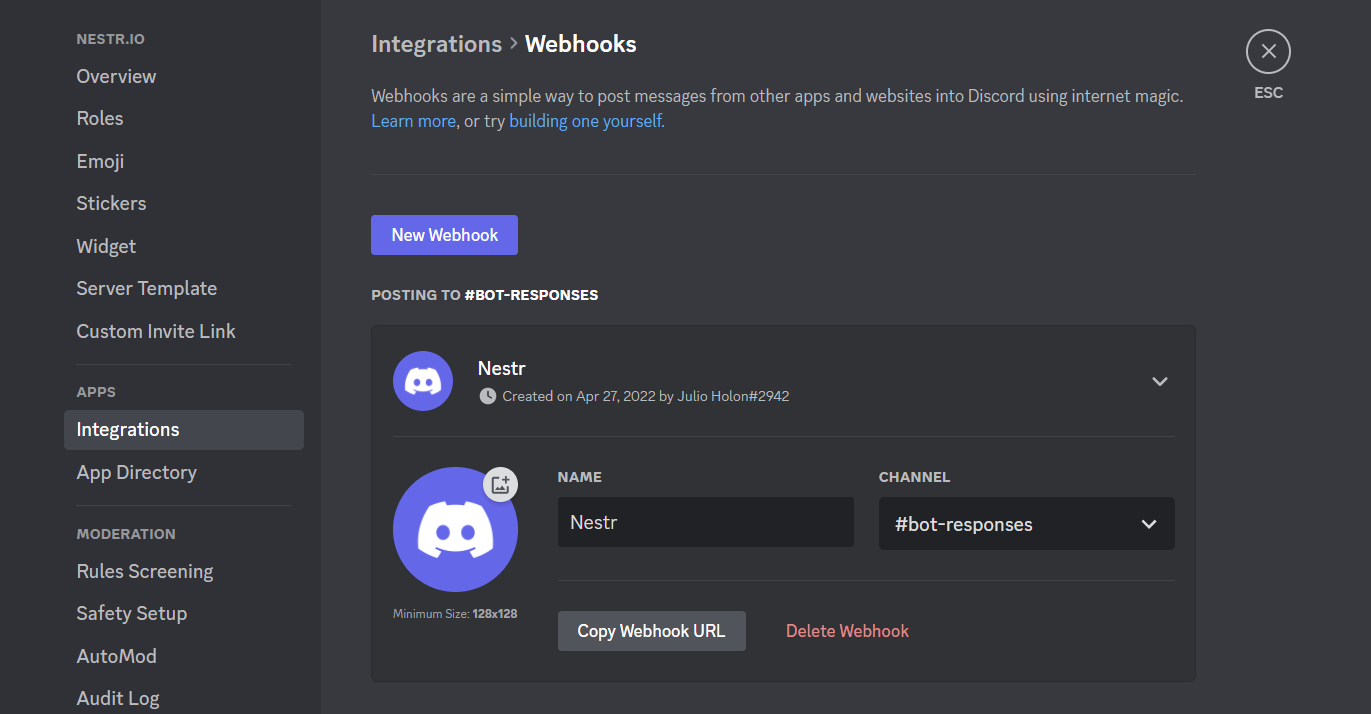
Once connected, you can post to a Discord channel from within Nestr by clicking the three dots on any item, selecting the Discord option and selecting the Discord channel you want to post to.
Chances are that you already have a central database with all your employees like Google Workspace, Microsoft Azure or an HR database. If this system supports SCIM (System for Cross-domain Identity Management) you can automatically add/remove uses from Nestr when you add remove them there.
All you need to do is go to your workspace settings:

There, if you have not already, go to 'User Permissions' and select 'Allow email users from certain domains to join this workspace' and enter all domains, you use when provisioning users. Note that once added, we'll do a manual verification on our end to ensure claimed domains actually match the workspace. Once verified (usually within 24 hours), the domain will show with a 'verified' tick. For full details on adding and verifying domains, see Verifying your workspace domain.

Once your domains are verified, enable the SCIM integration on your integrations page on your workspace settings:

For the rest of this article we'll use Azure as the example SCIM provider but the basics are the same for other providers.
In your Azure portal go to 'Enterprise applications' and click '+ New application'

When creating an application click '+ Create your own application', give it a name (eg. Nestr.io) and choose the option 'Integrate any other application you don't find in the gallery (Non-gallery)'.
When created assign the correct users and/or groups to your new Enterprise application and under 'Manage' to to 'provisioning'. Select 'Automatic' as the provisioning mode. Go back to Nestr and copy the SCIM API Url and paste it into the Tenant URL field under 'Admin Credentials'. Copy the API key from Nestr and paste it in the 'Secret Token' field. Click 'Test connection' to see if the configuration works. If it does, click 'Save'.

On the same page, open the 'Mappings' segment and click 'Provision Microsoft Entra ID Users'

There you can setup what information will be send across to Nestr. You can remove most fields and only leave the following mappings (note that userName may also be mapped to userPrincipalName). Click Save, close the settings window.

Now click 'Start provisioning' and all your users will be added to Nestr. Any user added to the users configured for access to the Enterprise application in Azure, will automatically be added to Nestr and any user removed, will be removed from Nestr. Note that this provisioning setup seamlessly works with our Google, Microsoft and SAML login methods as well.

Note that though Nestr supports SAML, in most cases newer authentication methods like OAuth and OpenID allow most of the benefits of SAML, don't need any configuration to use and offer a more seamless user experience.
SAML (Security Assertion Markup Language) is an authentication protocol to allow an organisation to centrally administer who within your organisation has access to what apps using an Identity Provider (IDP). If your organisation requires the use of SAML, here is how you can configure it.
Depending on your Identity Provider (eg. Azure) there might be some small differences in how the different fields are named. You should find where you can configure Single-sign-on (SSO) and configure SAML to use the following fields.
Identifier (Entity ID) https://app.nestr.io
Reply URL (Assertion Consumer Service URL) - Replace the domain.com with your registered domain: https://app.nestr.io/saml/consume/domain.com
Under Attributes & Claims please use the following setup
Claim name: Value
givenname: user.givenname
surname: user.surname
emailaddress: user.mail
Unique User Identifier: user.mail
Navigate to your workspace settings and go to the "Integrations" tab.


In your Identity Provider, find the correct values for the following fields and paste them into the configuration fields as shown above.
Identity Provider Entity ID
This is an ID specific to your app configuration within the Identity Provider. For Azure this looks something like: https://sts.windows.net/xx....xx/
Identity Provider SSO endpoint
This is the login URL Nestr will point users to wanting to login to a workspace using SAML. For Azure this looks something like https://login.microsoftonline.com/xx....xx/saml2
Identity Signing Certificate
This is a certificate used to ensure the login requests come from the correct IDP and you can download this from your IDP. Open it in a text editor and paste it into the field. It should start with -----BEGIN CERTIFICATE----- and end with -----END CERTIFICATE-----
Finally, to make this setup work flawlessly, we recommend you to add all the email domains you use within your organisation. Navigate to "User permissions" and check "Allow email users from certain domains to join this workspace". There you can add all domains you control (we'll take you through a verification process) so that when people try to login with those email addresses, they will be redirected to your required SAML authentication. See Verifying your workspace domain for the add and verify steps.
The Nestr api allows manipulation of items from outside the Nestr application. The api can be used to create an integration with other applications, or to easily add items from anywhere.
To get started, go to your workspace settings where you will find a tab called Integrations

There you will find the Workspace API access integration. Click configure and create a new API key.

You can optionally name the API key and give a description. If you have multiple integrations, it pays to setup a key for each one and name them accordingly. Once you have named your API key, click Create API key. This will generate and store the key for you. We will only show you the key once, so make sure you copy it and store it securely in a password manager.
The Nestr API key is a Bearer token. You can find the full API documentation and examples on our API documentation page.
Nestr can import your data from Glassfrog. It will import pretty much everything straight into your Nestr account.
In order to use that feature, you may want to start by creating a new Workspace, clicking the [+Create] button on "My Workspaces". After you create the workspace, head into it and navigate to the workspace settings page.

Once there, navigate to the 'Integrations' tab and enable the Glassfrog integration.

In there you have to fill the Glassfrog API key. You can create an API key in your Glassfrog account when you go into your organisation and go to "Your profile and settings" page and navigate to the "API" tab. There you can create a new API key. Do this and copy it across into the "Glassfrog API key" field in Nestr.
Check the box if you want to import users, if you would like to invite them directly into Nestr and hit the "Synchronise" button.
Depending on the size of your account this can take a few seconds to up to an hour. You can simply let it run in the background and see the circles and roles appear as they come in.
If you wish to update the latest changes from your Glassfrog account into Nestr, simply click the "Synchronize" button again and we'll import the changes for you.
Happy Nestring!
Nestr can import data from Holaspirit. Simply go to your workspace or create a new one.

After you created the workspace, head into it and navigate to the workspace settings page:
Once there, navigate to the 'Integrations' tab and enable the Holaspirit integration.

In there you have to fill the Holaspirit API key and Holaspirit Org ID.
In order to get your API key you will need to contact Holaspirit support (it's only available on the Scale plan and up) Please include the "api:" part of the given string.
To get your Holaspirit Org ID, you have to login into Holaspirit and copy the URL where you connect, to extract the ID, something like:
https://app.holaspirit.com/o/xxxxxxxxxxxxxxxxxxxxxxxx/
Copy the number and letters from the URL, after "/o/" and before the final slash.
After you have copied this into Workspace details, you can choose options before starting the import
Once you click Synchronize, you will see the importing steps going one by one. It could take some time for larger organizations.
You can re-run the import by clicking the Synchronize button whenever anything change on Holaspirit.
At nestr we believe you should be able to use the tools that best suits you. We try to make integrations and migrations as seamless as possible.
If you are using another tool for your self-organisation today we can import and sync the data from that tool into Nestr. This is a great way to try Nestr out using your actual data.
Once you have created a workspace you can navigate to the workspace settings.

There you will find an integrations tab. There are integrations for Holaspirit, Glassfrog, and Peerdom you can enable. Enable your tool of choice and run the import as described in these help articles:

These integrations will allow you to import pretty much all your data across. And you can simply run the sync again a few days/weeks later to update the data in Nestr.
If you know how to use an API, Nestr has a full-fledged API that will allow you to import and sync all your data.
If you currently use another tool or have your data stored in excel/sheets/csv. Please contact us and we'd be more than happy to import this data for you.
Your data is always yours and you have full access to it at all times.
Everything you see in Nestr you can directly export to csv/excel. The main search has an export button right in the search controls.

And most tabs offer an export button in the view controls.

If you know how to use an API, Nestr has a full-fledged API that will allow you to export and sync all your data.
One mantra we try to live by at Nestr is that we don't pretend to know how to best run your organisation. We are here to support any and all experimentation in persuit of your organisational purpose.
In that light, we offer our Automations app. It allows you to automate many different business processes relieving you of the manual work. Here are a few examples on how you can use it:
At current, only workspace admins can configure automations. You can enable it on 'Applications' tab of your workspace. Once enabled, you can create new automations to your workspace. You will see the following screen to start with

Let's run trough the automation options:
Once you have configured what the automation will target, how it is triggered and who the audience is, you can define what it should do in the 'Steps' section. Click the '+ Add an automation step', give the step an initial name and hit enter.
When you created your first step, click on it to open it. There you will have one drop down to set the step action with the following options:
When sending out an email, posting a message or creating new items, you may use the following template variables. Nestr will replace these before emailing, posting or creating.
When the target is a circle, these template options are available as well:
When your automation has a target, the following template options are available as well.
When you tie it alltogether, a fully configured automation could look something like this:

If you are a member of a workspace where the feedback app is enabled, you can give your peers feedback or request them to give you feedback.
Feedback is crucial in any organisation and specifically in a selforganized or role based organization as there is less centralized control or management, relying on your peers becomes more important.
This document assumes your workspace administrator has already setup the feedback app within nestr for you. If you can't see the options highlighted here, ask them to enable them for you.
There are a few ways to initiate feedback.
1) From "My feedback", click on "Give feedback"

2) From your circle's "Work" page under the "feedback" tab

3) Hover over your collegues profile picture anywhere within Nestr and select "Give feedback" from the context window.

When you click give feedback, the feedback pop-up will show where you can select the user and role to give feedback to (if you used option three to initiate the feedback, these will be pre-filled with the user you selected). Here you can search for either a user or a role to give feedback to.

It depends on how your organisation uses feedback if you will choose user or role feedback. We do advice role feedback in most cases as it will allow you to give specific and actionable feedback for one specific role at a time. A person might be great in their "Marketing role" and might need to grow in their "Facilitator" role.
Once you selected the user and their optional role, click next to give the actual feedback. If your organisation has setup multiple feedback forms to use, you will need to choose the type of feedback here too.
The specifics of the feedback forms is fully customizable per workspace. Here is an example of a simple Keep/Stop/Start feedback form. Note that when giving feedback to a user in a role, you can toggle the role open and closed by clicking on the name of the role in the header to help remind you what can be expected from your colleague in that specific role.

When you are ready, you can click "Give feedback" which will notify your colleague that you have given them feedback. Optionally if you are not quite ready yet, you may "Save for later" so you can continue and submit at a later time.
Once the feedback is given, the receiver will get an email and an in-app notification that they have new feedback to review. You can also find this on your "My feedback" page. New feedback shows at the top under "My feedback to process"

Click the view button to open it.

Here you can see who gave you feedback, to what role and the actual feedback. Take a moment to absorb the feedback and identify next steps to help you integrate the learnings provided by your peers.
As a feedback receiver, you can choose to add the feedback to your profile privately or publically. When private, only you and the feedback provider can see it. When made public, everyone within your workspace can see the feedback given. Only the receiver can change this setting to ensure sensitive feedback can be integrated in a way that feels save to the receiver.
All your given, received and pending feedback can be found on "My feedback" as well as in the circles where it was received/given.
Requesting feedback works the same as giving feedback accept that the receiver initiates it. Just like giving feedback it can be started from your My feedback page, from the circle feedback page or by hovering over any profile picture of a user you wish to request feedback from.

When you have selected one of your roles to request feedback on (or no role), you can add multiple people to request it from and give some context on the feedback you are after to help frame your request. They will receive the request in an email and in app notification to give you the feedback you are after.
Though transparency is an important part of self-organisation, at times rules and regulations or personal privacy require information only to be shared with just a few roles or people.
In these cases Nestr offers you a way to make pretty much anything private. You can choose who to share it with. As soon as you are assigned to a project, todo, meeting or note, you can make it private. Simply click the three dots on the item you wish to make private and click 'Make private'.

It will make that item and any items and conversations under it private and visible to only those assigned. All private items will have a light yellow background color so you always know what is private and what is not.

This private setting can be applied to meetings, agenda items, projects, notes, todo's, boards and everything that is not governance.
You can customise Nestr to suit your needs in many different ways and Labels are at the center of this. You can add a label simply by typing #name_of_label in the name, description or purpose field of any item (role/circle/project...) you interact with. If the label does not exist yet, you can create it right there and then.

You can also add labels anywhere you see the three dots.

As you can see, you can create a personal or workspace label. There are actually three types of labels.
In Nestr you can add labels to almost everything and there are three types of labels:
You can use labels in a few different ways. The can help you categorise and organise your work and organisation. Once assigned, you can easily search for any project/circle/role/etc. with your label by typing #your_label in the search field.

Also, almost all pages offer a way to filter on used labels. So your circle or role project board allows you to filter on certain labels so you can create focus. This is great for running a sprint where you label your sprint work with the label 'sprint_3' and filter on just that label for the duration of your sprint.

Labels also allow you to customise how Nestr works. If you go to your workspace settings you'll see a "Labels & Fields" tab where you can create and edit all workspace labels and some system labels.

If you click on any of the workspace labels you can edit the label name, color and add fields as well. Any field you define here will be added to all projects, roles, circles, etc. you have added this label to. This gets really powerful and you can add as many fields as you would like. At current you can add text, multiline text, number, currency, select, percentage and slider fields.

Then whenever you use a label, the fields will automatically get added to what you have added the label to. Here is an example of a 'Story' label where we added a story points and a traffic light field. Note that the values of the fields show up in both the detail view as well as the list view.

On top of adding fields to your own workspace labels, you can also change or add fields to some system labels. At current, you can update roles, circles and projects. If you add a field to any of them, they will show up throughout your workspace. you may also change the project status field and change the available options. This will in effect change the columns on your circle and role project boards as well. Here is a screenshot of a circle project board using custom columns.

Labels are the starting point for customising Nestr. These guides go deeper into what you can shape:
We look forward to seeing how you will be using the power of labels in your workspace.
Happy Nesting!
Nestr's search function is very powerful and is available whenever you use Nestr.

A search query can consist of a simple word or can be made up of a combination of many different parts. Here we lay out all the options available to you.
You can simply type anything you want and it will find any relevant matches. Nestr will match on the name, purpose or description of anything you have access to. So it will return any found users, projects, roles, circles, accountabilities, to-dos and notes. Click any of the results and they will open for you right there next to your search results.

At the top of the search results you have a few tools to your disposal to help you quickly find what you are after.
Click the filter icon to filter the search results on users and/or labels. This will allow you to zero in on the results you are after.

The last search tool in the search toolsbar is the group option. Here you can select if you want your results to be grouped by assignee, workspace or no grouping.

Besides using the search tools you can also use the autocomplete advanced search options available.
If you type label: or #, nestr will recognise you want to add a label search to your query and present you with a drop down of all the labels available to search with. Keep typing and we'll narrow the available options in the drop down and/or select the label you want.

label:bug,project, we'll show all matches with the label bug OR the label project.label:bug label:project we'll return all matches with the label bug AND the label project. label:!project and we'll remove all matches with the project label from the results.When you type assignee: or @ Nestr recognises you wish to limit your search results to only include those assigned to a certain person.

Nestr allows you to further refine your searches by using the has: operator.

This allows you to limit your search results in five different ways:
Nestr allows you to format the results you get from your searches in a couple of powerful ways.
By using sort: you can instruct nestr to sort the results. There are six ways to sort.

You can also add the optional sort-order: option. When omitted the default value is asc (ascending) will be used. If you choose desc (descending) the sort order will be inverted.
By adding groupby: to your search Nestr will group your results in groups of your choosing.

The options you can group by are:
Just like the groupby above, you can add a groupbycol: with the same options as groupby. The only difference is that rather than groups, nestr creates columns. It works exactly the same except that the representation is different. And you can even combine the groupby and groupbycol.

Here is an example where we show all projects with a column for each assignee.
Search results are also a great place to get work done in batches. Select multiple results with cmd, ctrl or shift click and delete, move, complete or export them in one go. See Bulk actions.
All searches you do you can save. Right next to the search a little save icon shows up. When you click it you get a prompt that allows you to name the search and add it to a group. This group will be added to your navigation with your search in it for easy access.
Happy searching!
Communication is baked into the heart of Nestr. Any item (role, circle, project, etc.) can be communicated about right there in context. No more jumping between tools to have a conversation about the thing you are working on.
Because Nestr is structured around circles, all communication within your organisation is naturally scoped to those circles. This gives the benefit of not having to deal with the noise from other teams in your organisation.
Each circle has a feed. The circle feed shows all communications that are happening inside projects within the circle so that nothing is missed.

On top of that you can create channels in a circle for specific topics. You can also add people from within or outside the circle to that specific channel. With the @ functionality you can mention people in a conversation and they will be notified.
You can start a direct message with anyone in Nestr. Simply click on their profile picture or find them in the search dialog to start a conversation. They will get a notification that you have reached out to them.

Messaging is always accessible in the bottom left corner of the screen no matter where you are in Nestr.
So you are ready to start organising your work in Nestr? This article will give you a quick overview of how work in Nestr functions.
All work items within Nestr are broadly separated into Projects and Tasks. A Project is any piece of work that requires one or more tasks to complete, for example "Write a new blog post" or "Design a product feature". Projects are owned by specific Roles, giving them clear accountability.
Looking across circles and roles, one can follow Projects organised by status and Tasks per Role and per person.

A Task is a single action, for example "Get feedback from design team" or "Correct spelling mistakes". A task is owned by an individual person. You can create subtasks and subtasks inside the project, that can be assigned to other people as well.

Working together often requires communicating with your peers. Within each task or project, you can have a discussion right there in context, by simply clicking "Comment" at the bottom of the page. You can mention your colleague to highlight something of importance by typing @name_of_your_collegue to mention them and they will get notified of your question.

As your projects and tasks grow in number, keep things tidy by selecting several items at once and updating them together. See Bulk actions: select multiple items and update them at once.
Nestr aims to support you in manifesting your purpose using self-organisation. This means you will no longer rely on a management hierarchy to make decisions but will have some form of explicit agreements on how decisions are made. Nestr support many different ways of setting this up. So weather you use Sociocracy, Holacracy, Teal practices or some other form of role based work, Nestr supports it. And across these different ways to self-organise, there are some common practices.
In all cases, you'll use roles and circles to express how accountability is distributed throughout your organisation.
Every role/circle will be made up of:
when you enable self-organization in nestr, we'll automatically add some common core roles to each circle you create. We'll follow accepted definitions of these core roles dependent on the type of self-organisation you have selected for your workspace. In most cases they will look something like this:
You can configure which roles to use in your workspace settings and can even add custom roles if the default setup does not serve your needs.

Any circle member can propose changes to roles, circles, and policies. This is a core principle of self-organisation. Nestr makes it simple to propose changes — either asynchronously or during a governance meeting.
For the full step-by-step guide on creating tensions, building governance proposals, running elections, and the async consent process, see Tensions & Governance Proposals: From Tension to Decision.
In Nestr everything is an item. From the biggest circle to the smallest task. An item can be anything depending on the labels you give it.
In its most basic form an item looks like a simple task. You give it a name, a description, assign it to someone and it can have a due date. On top of that, it can have labels, sub-items and you can comment on it. So in it's simplest form it looks like a todo or a task.
Any item can have children. This means you can have an item within an item, within an item... to infinite depth. If you type a label like #project (part of the system labels) or #your_label when you create an item and we'll ask you if you want to create a new personal or workspace label.

Nestr has powerful search and filtering capabilities. You can find items that have a certain person assigned by typing @name of person.

Or by typing #name of label to search for an item with a certain label.

This is a fundamental concept in Nestr and it is used throughout the app. Combined with the nesting capability described above it makes for a very powerful system.
The navigation on the left of the page is all about your personal overviews. It will show you all your workspaces, circles/roles, projects, todo's and feedback across all workspaces you are a member of.
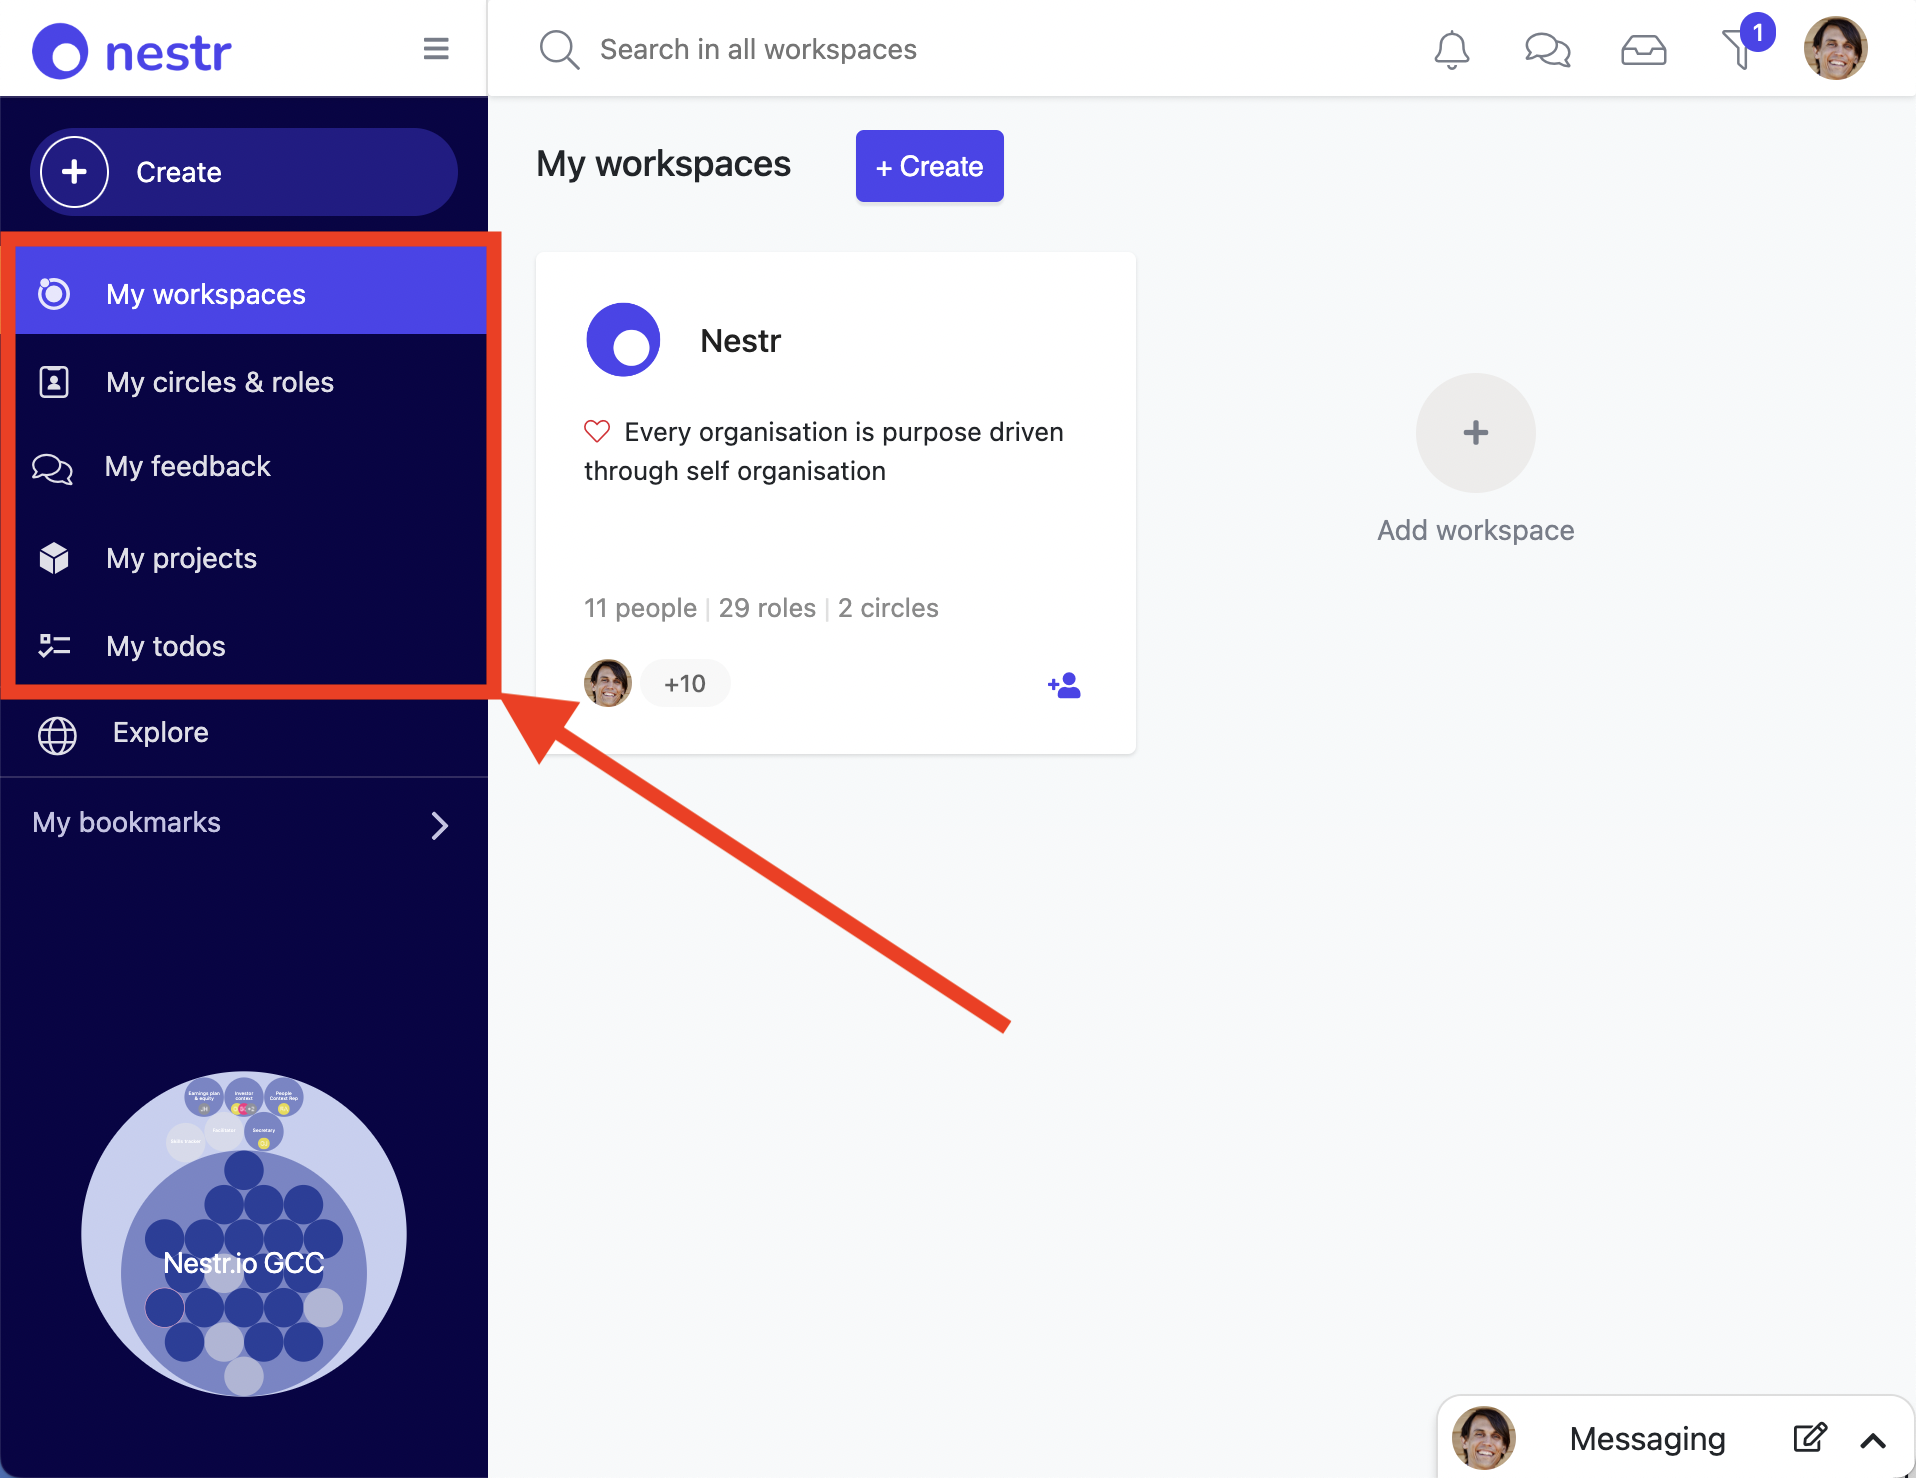
The circle view at the bottom shows you all the workspaces you are a member of in one overview. We call this your purpose fingerprint. If you click the arrows, you can maximise that view and use it to navigate your workspaces.

On the top right under your profile picture (or your initials if you have not yet provided one) you can find your account settings.
A workspace can represent an organisation or could be a personal project you run for just yourself. Whatever it represents, once you click it you will only see information relevant to that workspace.
Once you click on any of your worksapces, you will enter the workspace and see all relevant information for that workspace. In the below workspace you see these different parts:

When you have minimised the circle view, and you click on anything, it will open in a detail view on the right. When a detail view is open, there are a couple of parts to the page

You have been invited into Nestr by a colleague or friend. Let us run you through what Nestr is and how you can use it.
Nestr is a tool to help organisations get purpose driven work done using self-organisation and/or role based work.
This page is intended as a list of the most important help documents to quickly get you on your way.
Great, you have signed up for Nestr and are ready to test it out. The fact you are hear probably means you care about purpose driven work and self-organisation.
There are many ways to self-organise and Nestr aims to support any and all experimentation around self-organisation. And since we don't pretent to know what the best way to self-organise is, we try to offer you a product that can adapt to your needs.
In this article I will lay out how you can configure Nestr to serve you as best as we can.
First, go ahead and setup a new workspace.
Your worksapce is now created and ready for you to use. Here is an example of a non AI created workspace right after creation. Three core roles are created based on your governance method of choice.

In the top right of the new workspace you will find a settings icon. Click it to further configure your workspace.
There you will find the following tabs:
More on configuring your workspace can be found here.

If your are currently using another tool for your self-organisation, you can import that data into Nestr. Here is an article on how to do that for tools like Holaspirit, Glassfrog, Peerdom and others.
Now that your workspace is created, you can start using it. Here are a few articles that lay out the basics of using Nestr:
Let us run you through the basic functionalities of Nestr
Let me guide you through the different ways to navigate in Nestr.
Here I show how you can create projects and todo's and where you can find them
How to to start a circle/tactical meeting and run through the different steps.
If you'd like to suggest a change to a role, circle or policy, you can simply create an agenda item and propose it.
Please don't hesitate to reach out if you have more in depth questions. We're here to assist.
Many people starting with Nestr will also be somewhere on the journey of mastering self-organisation and role based work.
Our aim is for Nestr to both help you in your journey to master the practice of self-organisation as well as offer a simple and easy way to onboard you onto the product itself.
To help you on your way, we have created a two landing pages aimed at different audiences. Please choose one that is appropriate for you.
Also, feel free to use the help search at the top of the page or to click around through our help docs yourself.
Happy Nesting,
Joost