Nestr structures your organisation around purpose using roles and circles rather than traditional job titles and departments. Each role has a clear purpose, accountabilities, and domains. Circles are self-governing teams that contain roles and can nest within each other.
This guide walks you through building and managing your organisational structure step by step.
Creating a role
There are two ways to create a role:
From the circle's Structure tab
Navigate to the circle where the role should live.
Click the Structure tab, then select About.
Click Add role.
In the dialog that appears:
Enter a role name.
Optionally select a parent circle (defaults to the current circle).
Optionally provide accountabilities the role is responsible for
Optionally provide domains the role controls (as a general rule it is advisable to be conservative with adding domains)
Optionally assign users to the role immediately.
Click Create role.
Click the Add role button in your circle of choice
Craft your role by setting the Name, Purpose, Accountabilities and Domains.
From the sidebar
Click the + Create button in the left sidebar.
Select Create role.
Fill in the same dialog fields and click Create role.
Note: In workspaces with governance enabled, non-admin users may see Create proposal instead of Create role. This routes the role creation through the governance consent process so circle members can review it.
Creating a sub-circle
Circles are teams within your organisation that contain their own roles. To create a sub-circle:
Navigate to the parent circle.
Click the Structure tab, then About.
Click Add sub-circle.
In the dialog:
Enter a circle name.
Choose the parent circle.
Add accountabilities — click "Add an accountability" for each one.
Add domains — click "Add a domain" for each one.
Optionally assign users.
Click Create circle.
Creating a circle is much like creating a role
When a new circle is created, Nestr automatically generates four core governance roles inside it (hese core roles can be changed under Workspace Settings -> Applications -> Core roles):
Circle lead — has circle admin rights
Facilitator — runs meetings (electable)
Secretary — manages governance records, has circle admin rights (electable)
Rep link — represents the circle in its parent circle (electable)
"Circle admin rights" is a configurable field on every role, not a fixed property of the four core roles. You can set it to any of the built-in shortcuts (Normal member, Circle admin, Role assigner, Circle plus sub-circles admin) or to any custom permission profile defined in your workspace. Whoever fills the role inherits the chosen rights inside the role’s circle and loses them again on unassignment. See Rights management.
Assigning people to roles
Navigate to the circle containing the role.
Click the Structure tab, then Roles.
Find the role in the list and click it to open the detail panel.
In the user section at the top, click to add or manage assignments.
Assign users to a role
You can also hover over any user's avatar in the role fillers widget on the left side of the Roles tab.
Removing someone from a role
Navigate to the role via Structure → Roles.
Click the role to open the detail panel.
Click the assigned user's avatar or name.
Click the Unassign to remove them from the role
Hover over the user avatar and click Unassign to remove a user from a role
Alternatively you can also click the User icon in the top right and click the X in the pop-up and save to remove the user from the role.
Managing the users from the assignee list pop-up
Moving a role to another circle
To move a role from one circle to another, you can change the role's parent circle. If you have admin rights, you can:
Click the ... in the right top of the role
Click the 'Move item' option
Search for and select the circle you wish to move the role to.
Moving a role when you have admin rights.
More appropriate is to use proposals so that all circle members can consent to the proposed move. through proposals you can only move a role up or down in the circle hierarchy one step at a time. To do this:
If you want to move the role into a sub-circle, click the edit button (pencil icon in the top right) on the sub-circle you wish to move the circle into.
This opens a proposal to edit the circle.
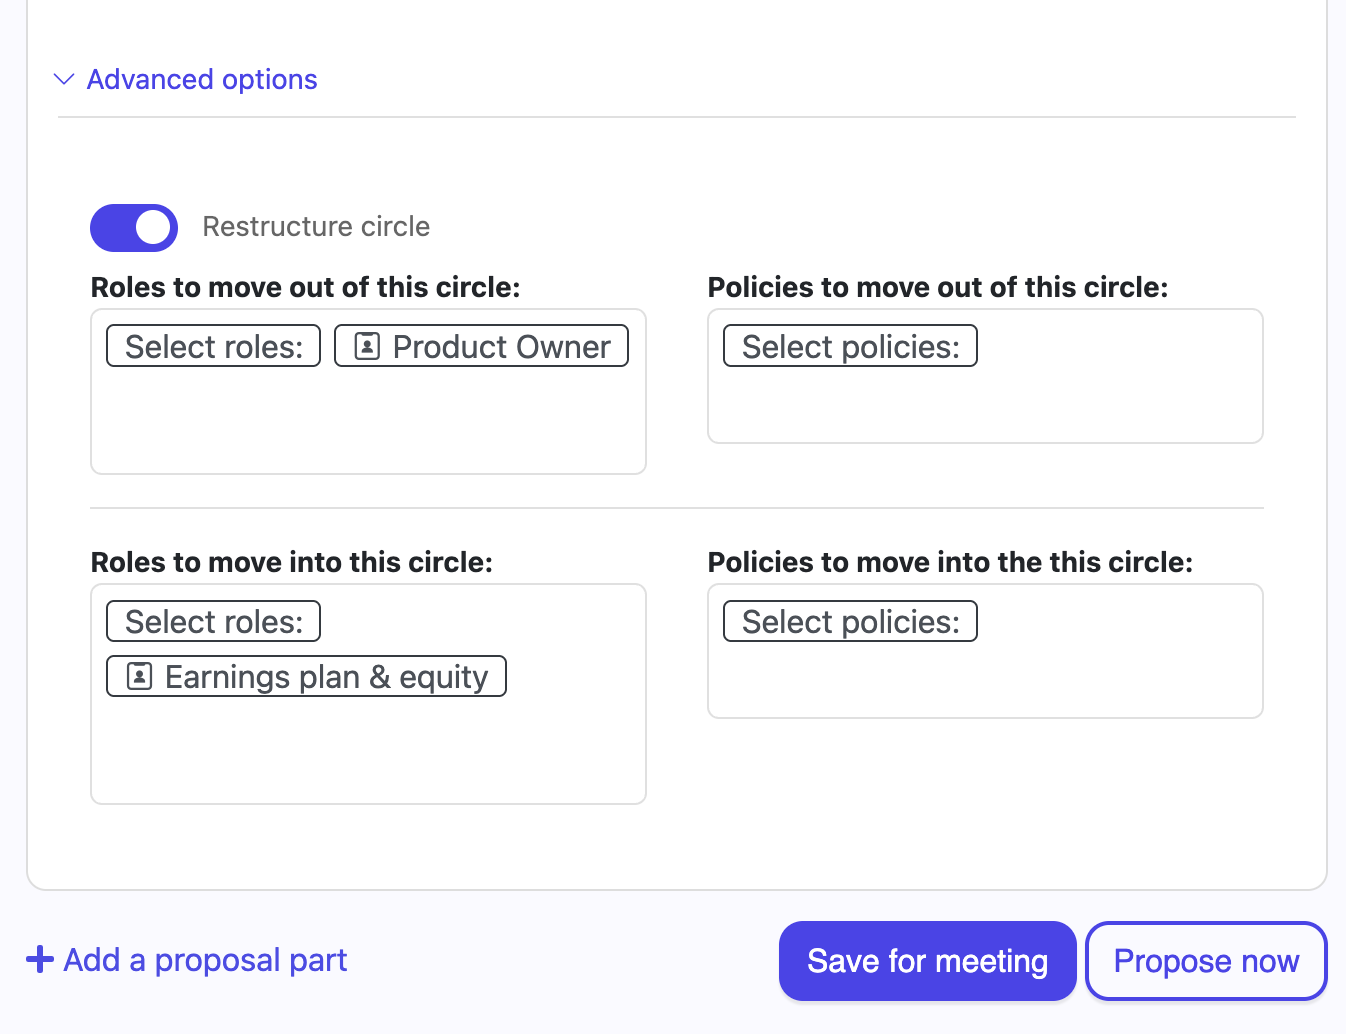
At the bottom of the proposal, open the advanced settings and toggle 'Restructure circle'
Select the roles and policies you wish to move in/out of the circle.
Edit the circle you wish to move the role into/out of.
Move roles and policies in and out of circles using a restructure.
Core governance roles
Every circle automatically comes with four core governance roles:
Circle lead: Holds overall accountability for the circle's purpose (assigned by parent circle)
Facilitator: Facilitates circle and governance meetings
Secretary: Manages governance records and meeting logistics
Rep link: Represents circle's needs in the parent circle
These are reasonable defaults you can change to suit your needs at Workspace Settings -> Applications -> Core roles. (requires admin rights)
Create as many template roles you need.
To assign someone to a core governance role, navigate to the circle's Structure → About tab where these roles are listed, and assign users just like any other role.
Domains and policies
Each role and circle can have domains (areas of exclusive control) and policies (rules granting or restricting access to domains):
Navigate to the circle.
Click Structure → Domains & Policies.
Add domains or policies as needed.
You can create domains and policies for each role/circle.
In governed workspaces, changes to domains and policies go through the governance proposal process.
Circle membership
In Nestr, circle membership is determined by role assignment. When someone is assigned to any role within a circle, they automatically become a member of that circle. There is no separate "add member" action — membership flows from role assignment.
This means everyone in a circle has a clear reason for being there: they fill at least one role that contributes to the circle's purpose.